
The Easy Guide to Cold Water Pasteurization for Straw (Using Lime, Calc, or Ash)
If you are growing mushrooms on straw, especially oysters, wine caps, or stropharia, you have probably heard about pasteurization. The goal is simple: give your mushroom spawn a head start by knocking back the mold and bacteria that naturally live on straw, without sterilizing it completely.
While hot water pasteurization is the gold standard for many, Cold Water Pasteurization (also known as Lime Pasteurization) is a fantastic, low-energy alternative. You don't need a giant pot, a burner, or a propane tank. All you need is a bucket, some cold water, and a source of alkalinity.
Let’s dive into how to do it, and what you can use to get that pH high enough to do the job.
Why Does It Work?
Cold water pasteurization relies on high pH (alkalinity) rather than heat to kill contaminants. By soaking straw in highly alkaline water (pH 11 or higher), you create an environment where most competing molds and bacteria cannot survive. However, mushroom mycelium, specifically fast-growing species like Oyster, can handle the high pH long enough to colonize the straw. Once colonized, the mushroom mycelium lowers the pH naturally and takes over.
What You'll Need: The "Alkalinity" Options
You have a few choices when it comes to the ingredient that raises the pH. Here are the three most common:
Hydrated Lime (Calcium Hydroxide): This is the most reliable and commonly recommended option. It is also known as pickling lime (sometimes sold in grocery stores for canning) or builders lime (available at hardware stores).
Crucial Warning: Do not use agricultural or garden lime (Calcium Carbonate). It will not dissolve well and will not raise the pH high enough to pasteurize. You need the hydrated stuff.
"Calc" (Calcium Hydroxide): If you are in Europe or reading forums, you will see the term "Calc." This is simply the German word for lime, and it refers to the same chemical: Calcium Hydroxide. If you buy "Calc" or "Weisskalk" at a European hardware store, you have the right stuff.
Wood Ash (The "Back to Basics" Option): If you can't find lime, or you want a truly rustic approach, you can use hardwood ash. Ash is alkaline (it contains potash and some residual calcium oxide). However, it is less predictable than lime.
How to use it: You need a lot more ash than lime. A common ratio is to fill a mesh bag with ash and let it soak in the water, or simply mix a high volume of ash directly into the water until it turns "slippery" to the touch (indicating high pH). Because ash is weaker, soaking times may need to be extended, and the success rate can vary depending on the type of wood burned. It works, but for consistency, lime is the winner.
The Recipe: Measurements That Work
The golden ratio for hydrated lime (pickling lime or Calc) is:
2 grams of lime per 1 liter of water.
Here is how that translates for different sized buckets:
Water Volume Lime Required (by weight) Approx. Volume (Cups/Spoons)
1 Liter ( ~1 Quart) 2 grams ~ ¾ teaspoon
10 Liters (~2.5 Gallons) 20 grams~ 2 Tablespoons
20 Liters (~5 Gallons) 40 grams~ ¼ Cup + 1 Tbsp~
200 Liters (55-Gallon Drum) 400 grams ~ 2.5 to 3 Cups
Pro Tip: A kitchen scale is your best friend here. Measuring lime by volume (teaspoons/cups) can be tricky because it compacts differently depending on the brand. If you can, weigh it!
Step-by-Step: The Process
Step 1: Safety First!
Hydrated lime (and ash water) is caustic. It has a high pH, meaning it can dry out and burn your skin. Wear gloves, safety glasses, and a dust mask when handling the powder.
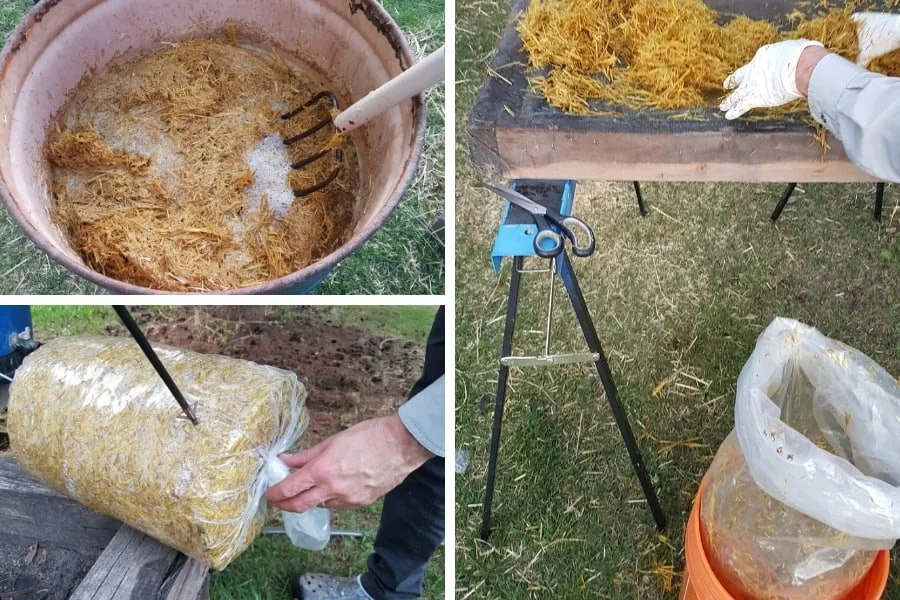
Step 2: Prepare the Straw
Chop your straw into 1-3 inch pieces if it is long and stringy. This makes it much easier to mix with spawn later. Stuff the straw into a mesh bag, pillowcase, or a plastic laundry basket that fits inside your bucket.
Step 3: Mix the Lime Bath
Fill your container with cold water. Sprinkle your measured lime (or ash) into the water and stir vigorously until it dissolves. The water will look milky or cloudy.
Step 4: The Soak
Submerge the straw completely. You must keep it underwater. Put a heavy plate, a brick, or a clean rock on top to weigh it down.
Let it soak for 16 to 24 hours.
Step 5: Drain and Rinse? (The Great Debate)
After soaking, pull the straw out and let it drain.
Do I need to rinse? Some growers rinse the straw with fresh water to neutralize the pH before adding spawn, worried the high lime will hurt the mycelium. Others do not rinse, believing the high pH acts as a "protective shield" until the mycelium takes over.
The Consensus: If you are growing Oysters, you generally do not need to rinse. If you are growing a more sensitive species, a quick rinse with clean water won't hurt. The most important thing is that the straw is at field capacity—moist but not dripping when you squeeze a handful.
Step 6: Inoculate
Mix in your grain spawn immediately. Your straw is now clean, wet, and ready for the mushrooms to take over!
Final Tips for Success
Don't Reuse the Water: The lime water will be full of dead bacteria and mold spores by the end of the soak. Do not use it for a second batch, as it is no longer "clean."
Check the Smell: When you open the bucket after 24 hours, the straw should smell clean, perhaps a little earthy. If it smells sour or rotten, something went wrong (likely not enough lime or the straw wasn't fully submerged). Toss it and try again.
Hydrated Lime vs. Quicklime: Make sure you have Hydrated Lime (Calcium Hydroxide). Do not use Quicklime (Calcium Oxide), which is much more dangerous to handle and creates a violent exothermic reaction when mixed with water.
Cold water pasteurization is a game-changer for the home grower. It is cheap, requires no energy input, and is surprisingly effective. Whether you use pickling lime from the supermarket, Calc from the hardware store, or a bucket of foraged ash, you are on your way to a bountiful mushroom harvest.
Happy growing