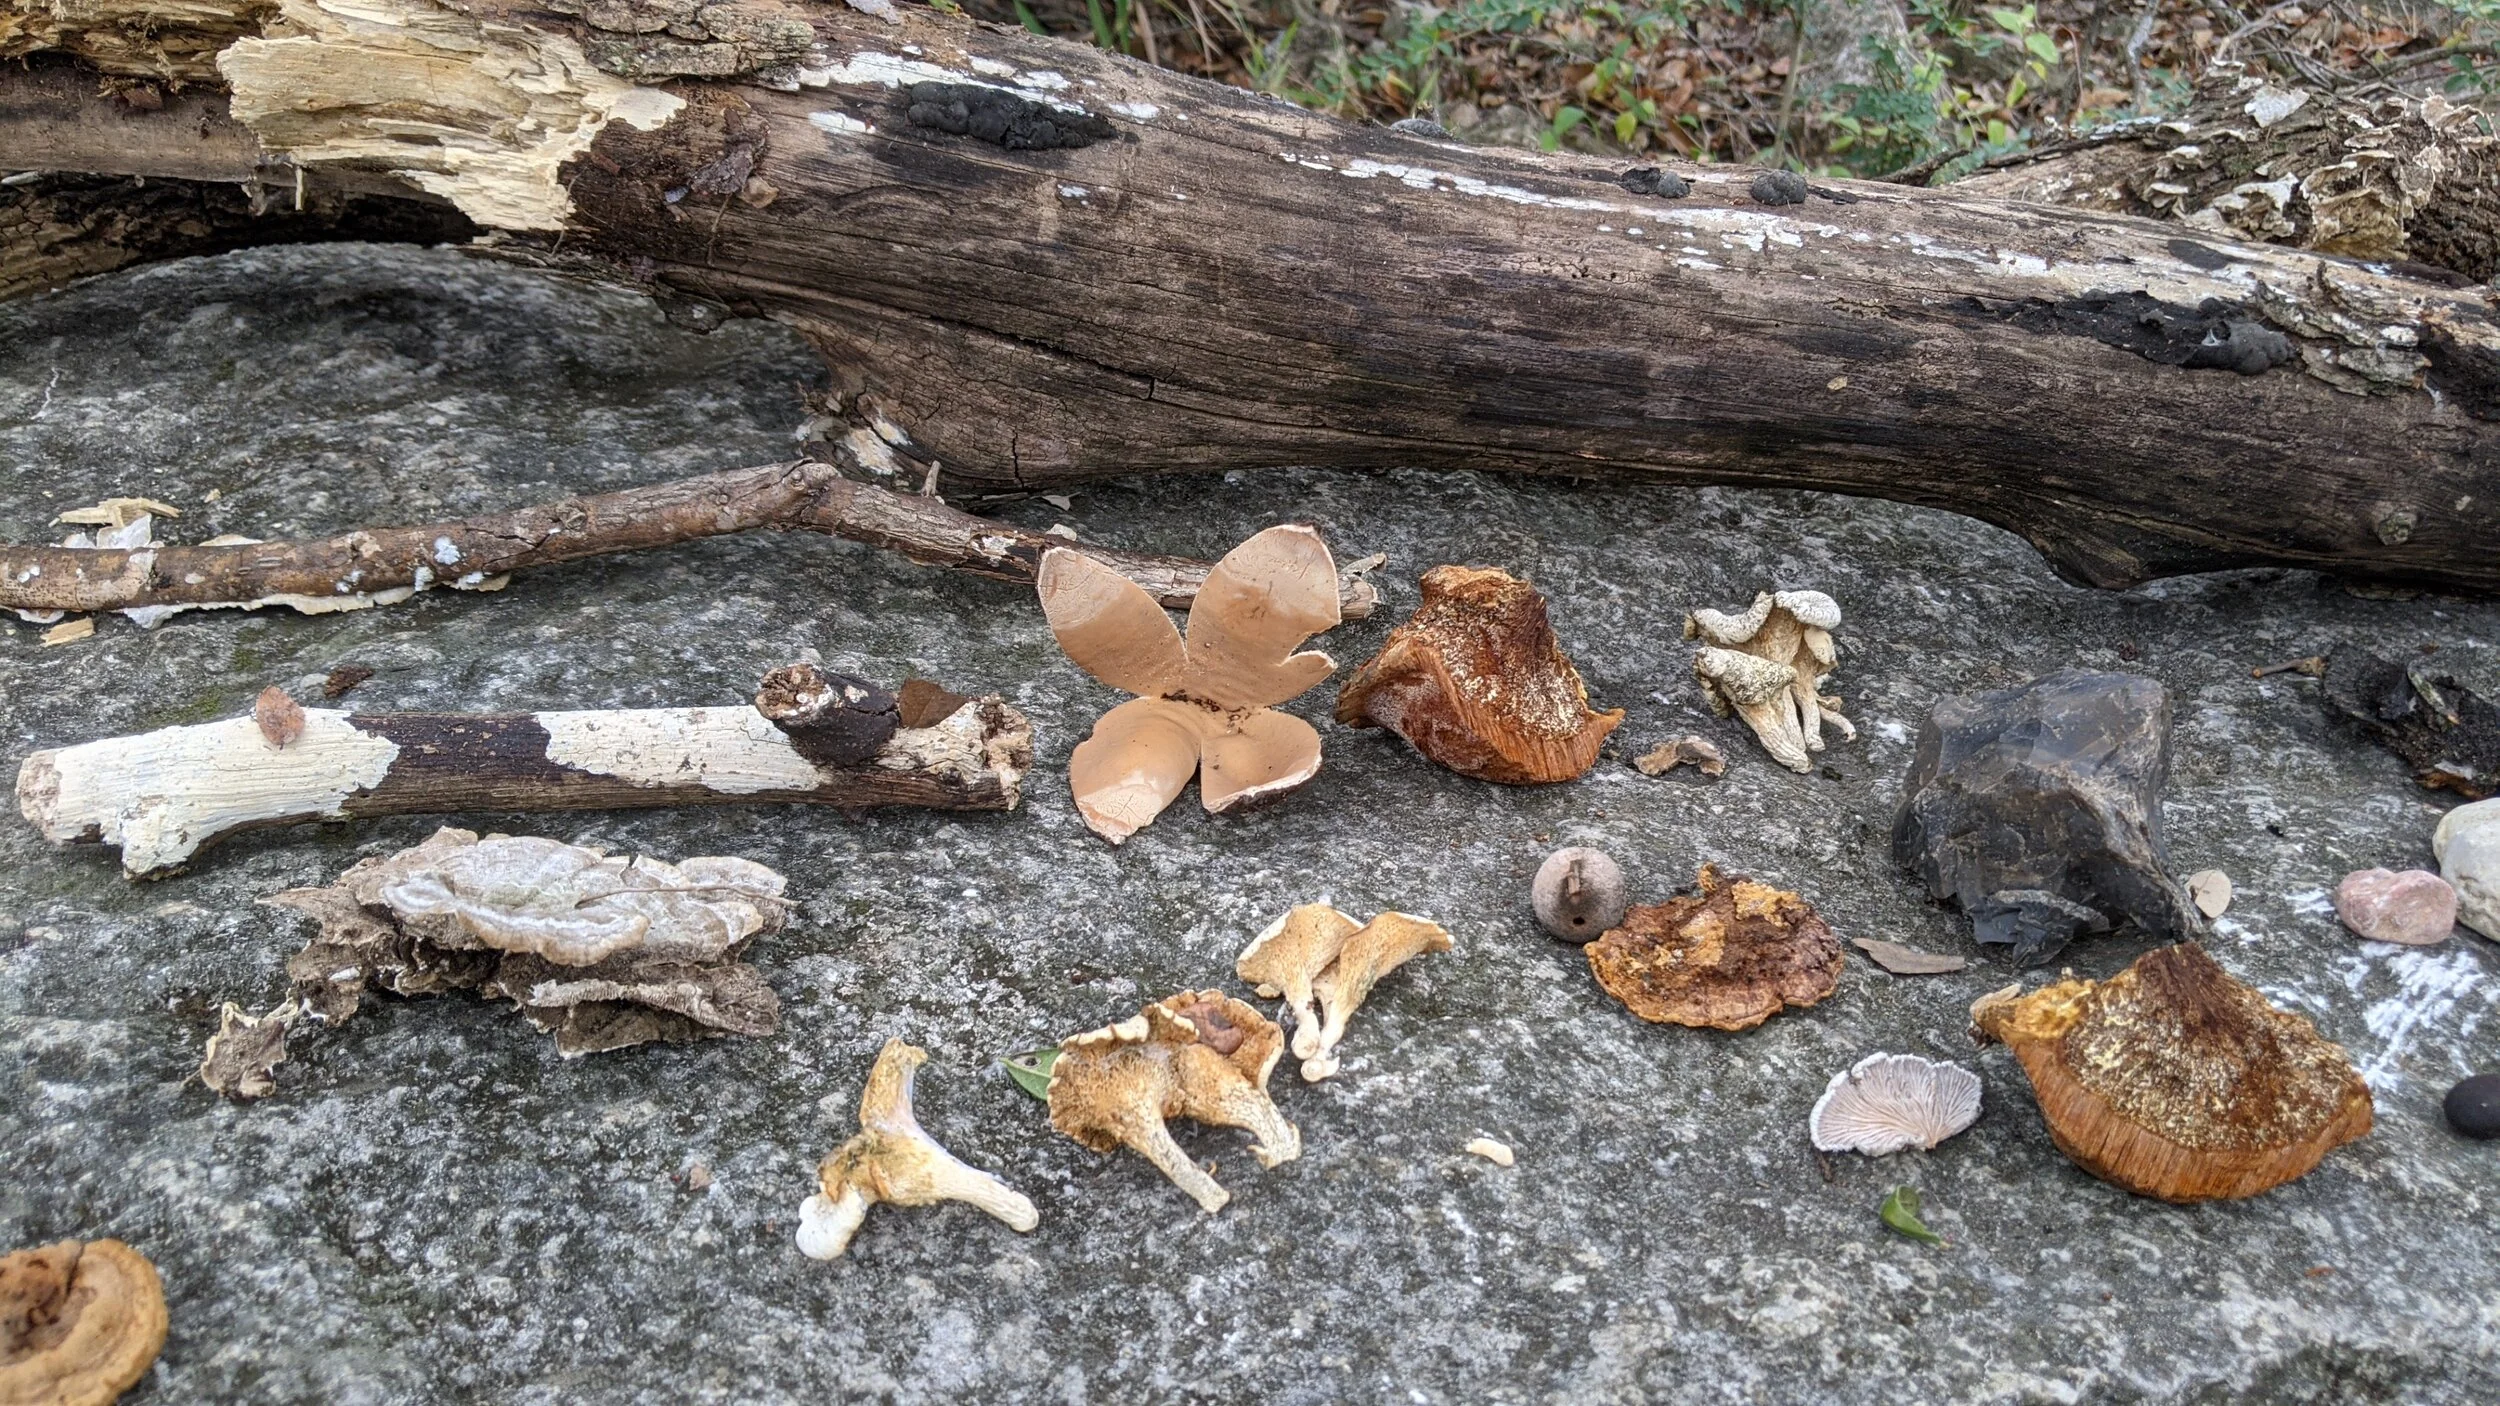

March Foraging Forecast
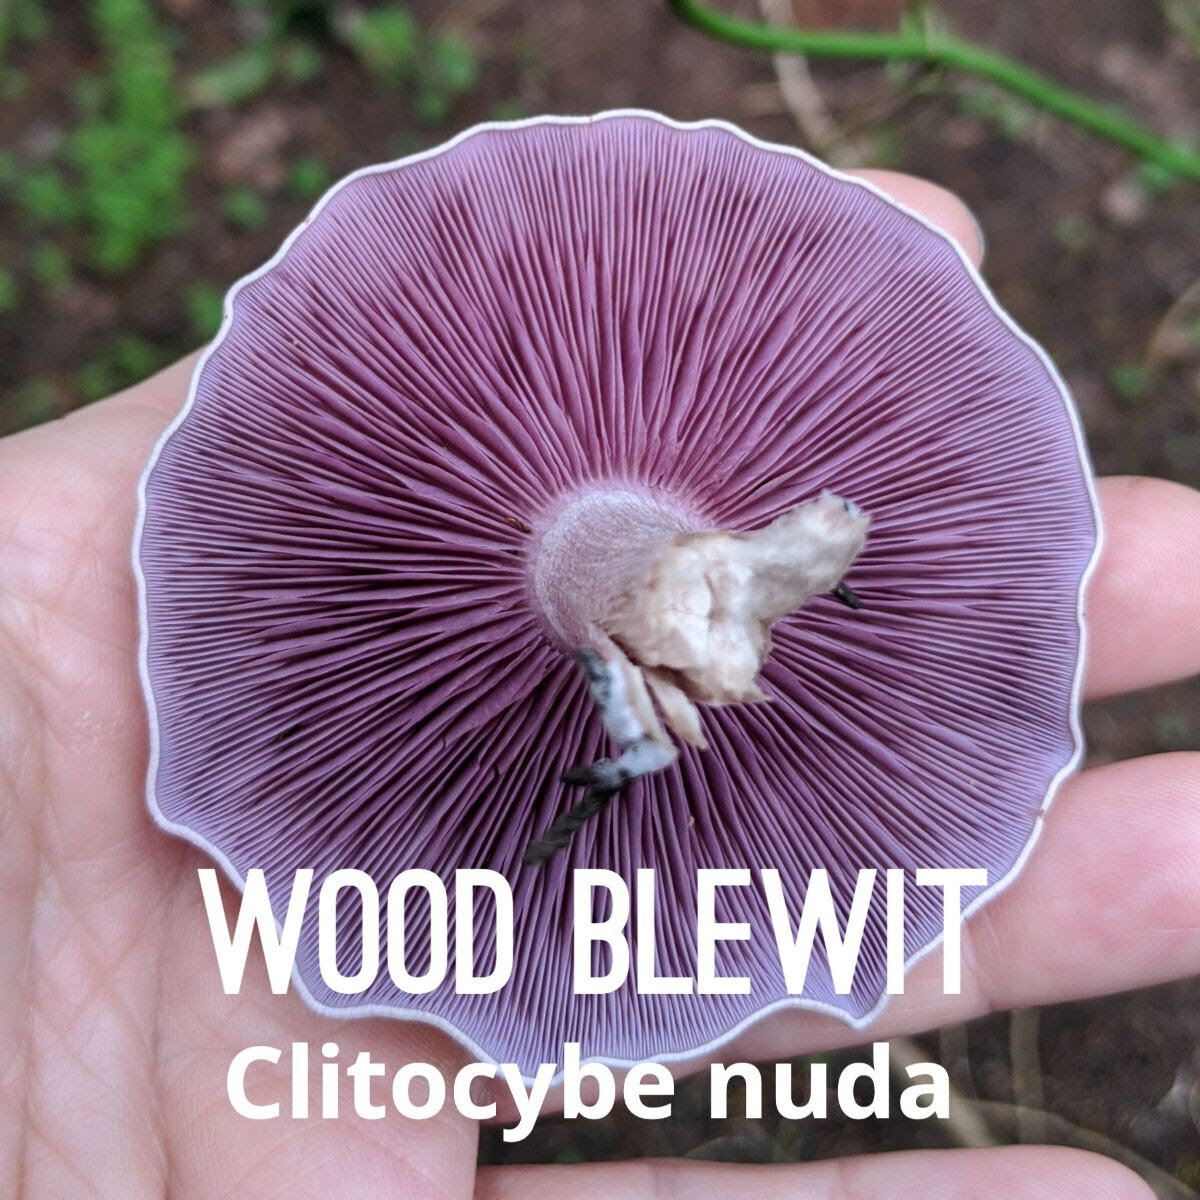
As the weather continues to cool, look out for the edible Wood Blewit, Clitocybe Nuda. This distinct lavender-colored mushroom is found in hardwood leaf litter and is a great decomposer.
MOREL: As the dewberries blossom, the choice edible morel, Morchella sp. starts to flush in Central Texas. These distinctive fungi have a honeycomb appearance due to the network of ridges with pits composing their caps. I'm already thinking about how to preserve morels so I can pair them with dewberries.
I found my first morels in Texas last year just as the pandemic shut everything down. SXSW was canceled and in my new found free-time I wandered near creeks looking under junipers for the honeycombed, yellow mushrooms. Morels have a mycorrhizal relationship with hardwood trees. In Texas, they are found near cedars or Juniperus ashei. They have a preference for soil with limestone and can be found near creeks but I have also observed them in boggy areas far away from creeks. They are illusive but do require moisture from rain. There is a lot of hope for this morel season because they need at least six weeks of freezing temperatures to grow but obviously they have adapted to our shorter winters in Texas. Be sure to tag us if you find any morels this season.
False Morels (Gyromitra carolina, Verpa species, Helvella species)
WOOD BLEWIT: As the weather continues to cool, look out for the edible Wood Blewit, Clitocybe Nuda. This distinct lavender-colored mushroom is found in hardwood leaf litter and is a great decomposer. Be warned because there are deadly, poisonous look-alikes in the Cortinarius family that grow in similar conditions. It's important to do a spore print AND also confirm the ID with an expert. The spores of the wood blewit are light pink to white and the spores of Cortinarius mushrooms are rust colored. I wrote up a blog post with lots of photos and details to help you identify this mushroom.
Fresh wood blewits are great with eggs in breakfast tacos. As they get older they become more tan and iridescent colored on the cap and taste bitter. I throw the older wood blewits my compost leaf pile because they are such great decomposers and will colonize and grow in hardwood leaf litter.
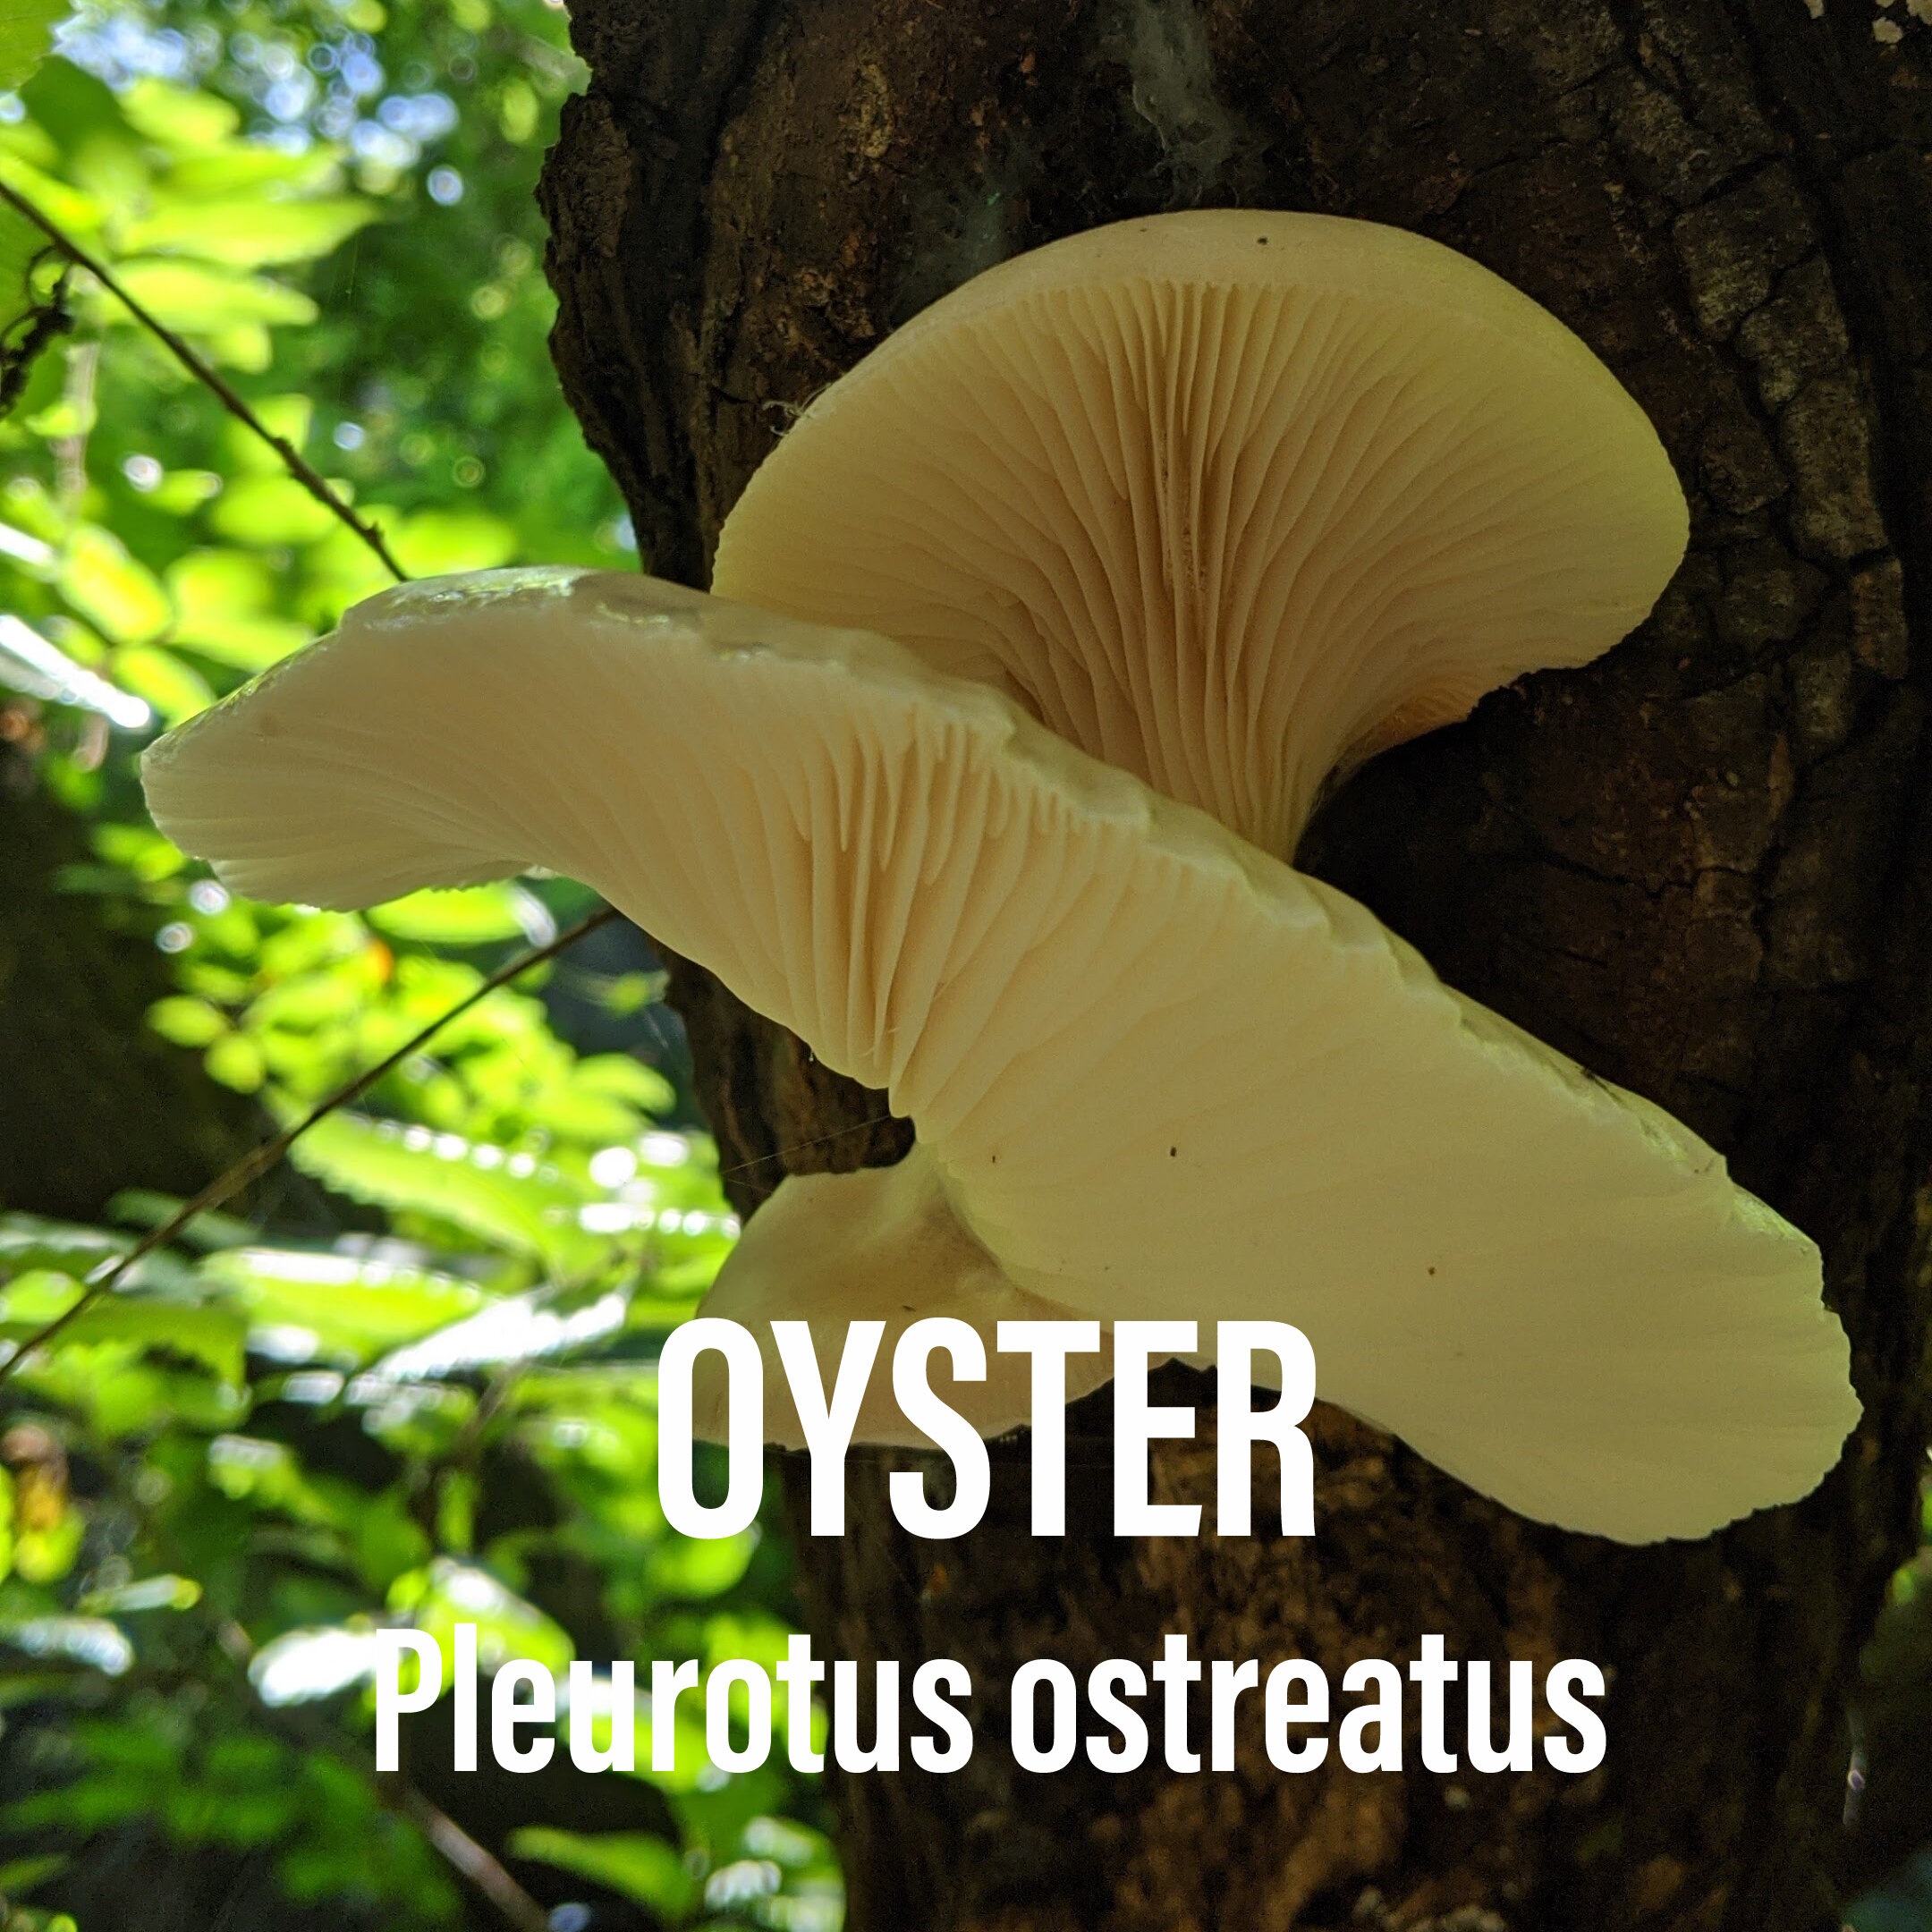
OYSTER: Continue to keep an eye out for Oyster Mushrooms, Pleurotus ostreatus grows on dead black willows and oaks. There have been several observed along creeks and rivers recently.
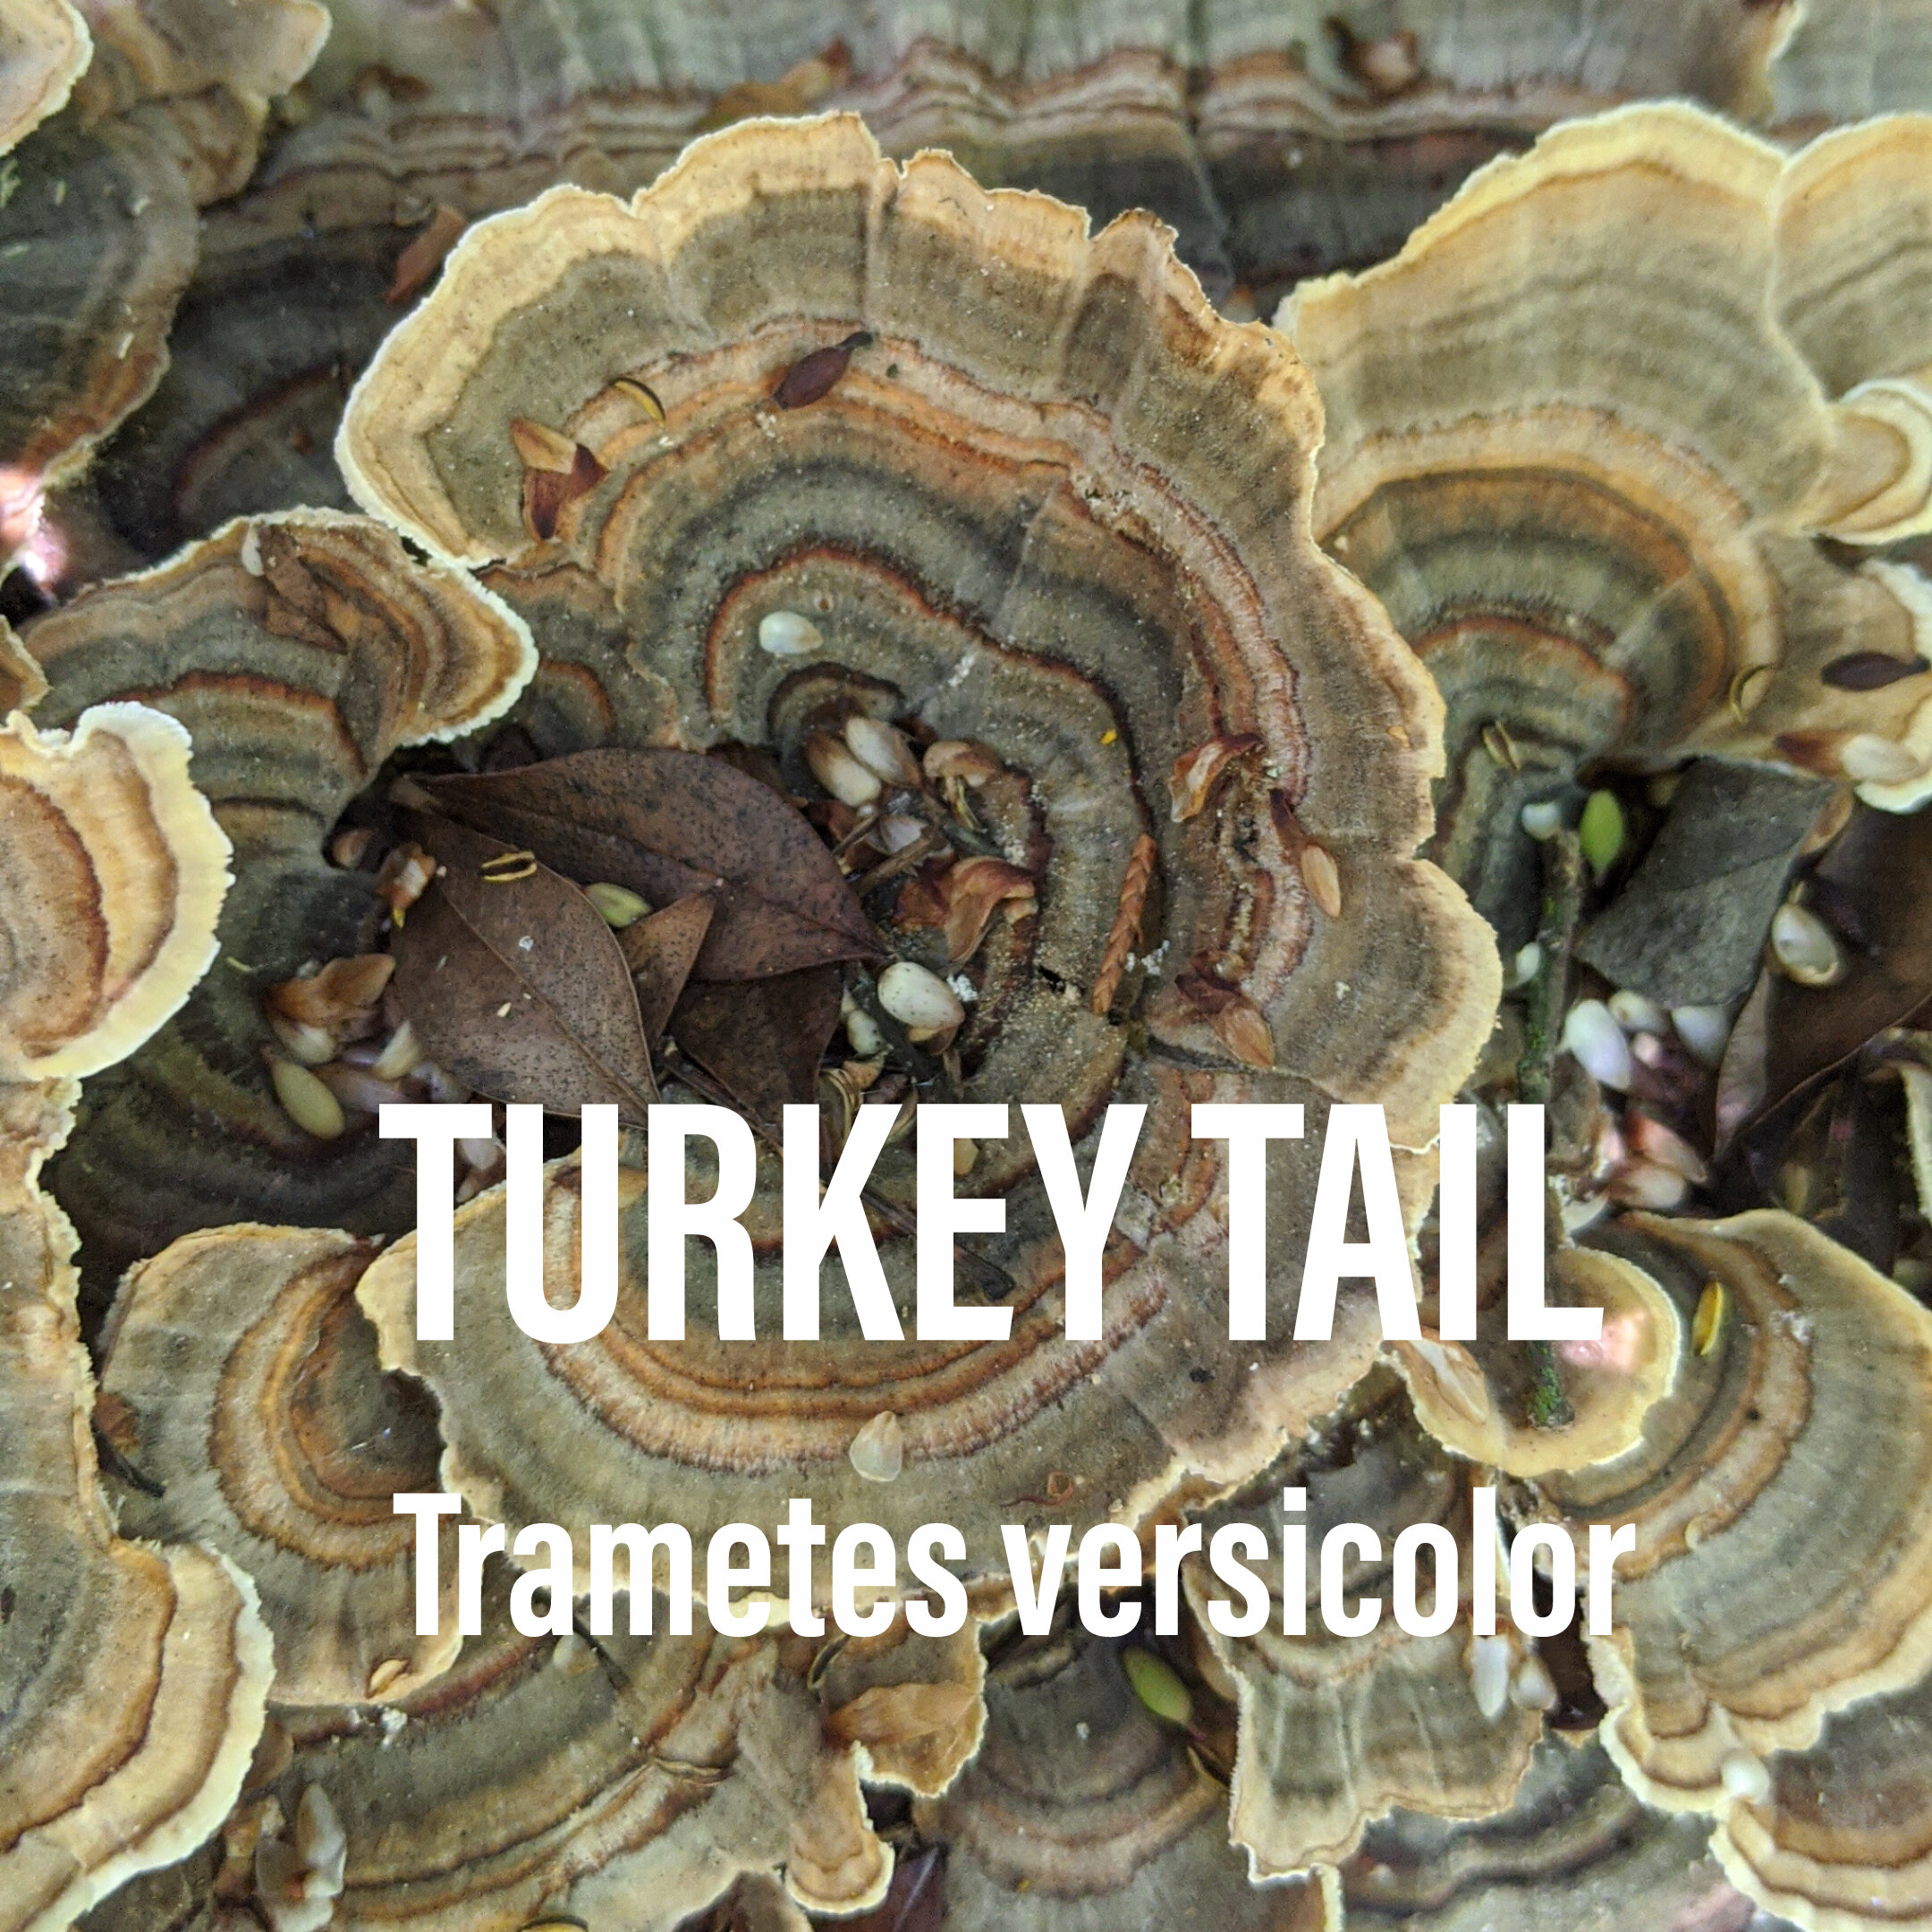
TURKEY TAIL: The medicinal mushroom Turkey Tail, Trametes versicolor will also flush after rain on downed hardwood logs, stumps and, occasionally, on conifer wood. Make sure the underside is porous and white because it can look a lot like False turkey tail. Mushroom Expert has a useful check list to determine if it is true medicinal turkey tail.
WOOD EAR: Auricularia americana, an edible jelly fungus pops up on downed hardwood limbs a few days after a good rain. Wood ear mushrooms are a popular ingredient in many Chinese dishes, such as hot and sour soup, and also used in Chinese medicine. It is also used in Ghana, as a blood tonic. Modern research into possible medical applications has variously concluded that wood ear has anti-tumor, hypoglycemic, anticoagulant and cholesterol-lowering properties.
As always, if you are trying a new mushroom, confirm the ID with an expert, then try a small amount to make sure you don't have an allergic reaction. Texas Mushroom Identification Facebook group is great for quick responses and ID help. Also, don't forget to add your finds on the Mushrooms of Texas project on iNaturalist.
Follow my adventures @forage.atx.


PART 5: Grow Mushrooms on Logs
Mushroom logs are a great way to incorporate fungi into your home scale or hobby enterprises. They can be placed around a garden bed or stacked in shady areas of the garden. Logs are a reliable and hardy way to grow wood eating species such as shiitakes and oysters, and are great for home-scale gardeners.
Mycology in the Garden
Mushroom logs are a great way to incorporate fungi into your home scale or hobby enterprises. They can be placed around a garden bed or stacked in shady areas of the garden. Logs are a reliable and hardy way to grow wood eating species such as shiitakes and oysters, and are great for home-scale gardeners.
In this video we show you how to inoculate logs with medicinal reishi mushrooms in your garden. It's a great way to decompose logs and add organic material to your ecosystem as well as grow medicinal mushrooms that have been used in Traditional Chinese Medicine for 4,000+ years. We are joined by Carter Humphrey from Central Texas Mycological Society and the Myco Research Station at Circle Acres.
STEPS TO GET STARTED
Besides the mushroom culture, the most important part is having the right wood. Find a hardwood log that is fresh - no more than a month old. This ensures it isn't already home to other fungi, and yours will have a clear shot at colonizing the log.
Purchase inoculated dowels for your logs - species that do well in Texas are shiitake, oyster, turkey tail, and reishi. Growing your own is quite doable, but takes setting up a clean environment at home. We recommend North Spore and Mushroom Mountain.
Once you have logs that are right for your project, cut them into lengths that are easy to handle: 2 to 4 feet with a diameter of 6 to 10 inches is ideal.
Drill holes about 1 to 1 ½ inches deep into the log in at regular intervals - about 4 to 6 inches apart in a diamond pattern, all around the log. Doing more will make it easier for the mushroom mycelium to spread through the wood and go faster.
Tap the plugs into each hole with a hammer until they are flush with the edge of the log. It's a bit like grafting a tree. Brush melted paraffin or beeswax over the hole to seal it up, which will keep it moist and protected for the first few weeks. If you do not have beeswax, you can make a seal from wet newspaper.
Some people also wax one end of the log to keep moisture in, leaving the other side unwaxed in order to allow for wicking.
Situate the logs under dappled shade, or on the shady side of a building where you can visit to check on them once a month. Near a water source is ideal - the logs should be kept moist. If they become light and dry, you'll need to wet the logs.
RELATED videos in the series:
Part 1: How Fungi Benefits the Soil
Part 2: Grow Mushrooms on Wood Chips in The Garden
Part 3: Grow Mushrooms in a Straw Bale
Part 4: Grow Mushrooms in Containers
Part 5: Grow Mushrooms on Logs
Part 6: Grow Mushrooms using Trench Composting Method

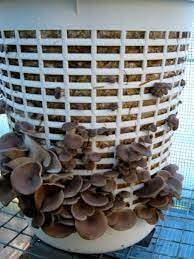
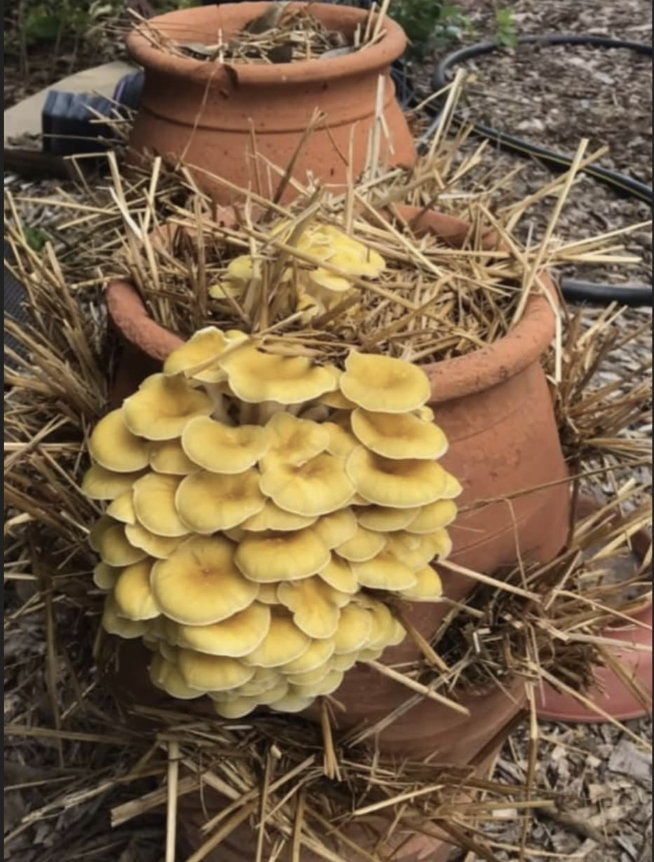
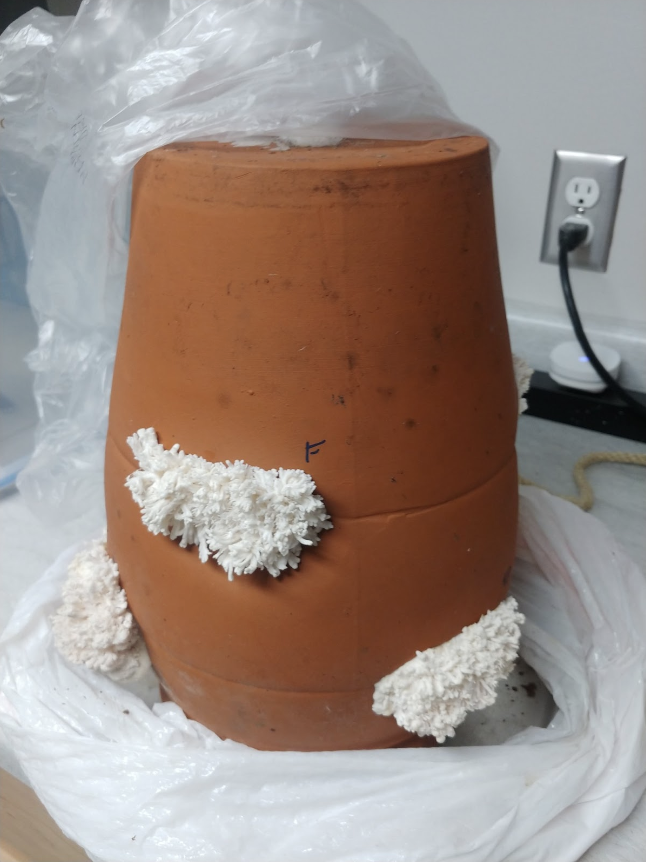
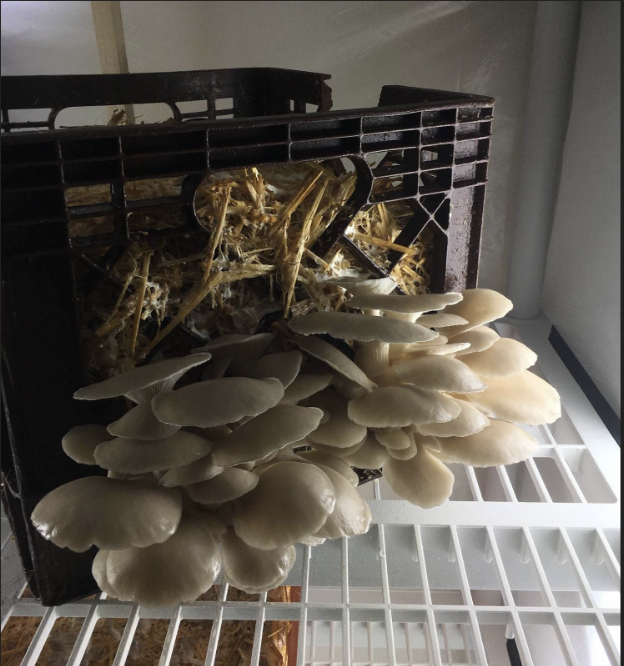
PART 4: Grow Mushrooms in Containers
This video will show you how to grow oyster mushrooms on straw bale in containers. In this six part Mycology in the Garden video series, we will show you five low-cost and low-tech ways to grow edible mushrooms outdoors. These basic techniques require no special equipment or electricity, and can all be done outdoors using organic materials found such as straw, leaves, wood chips and logs which all make for great mushroom substrate.
This video will show you how to grow oyster mushrooms on straw bale in containers.
MATERIALS NEEDED:
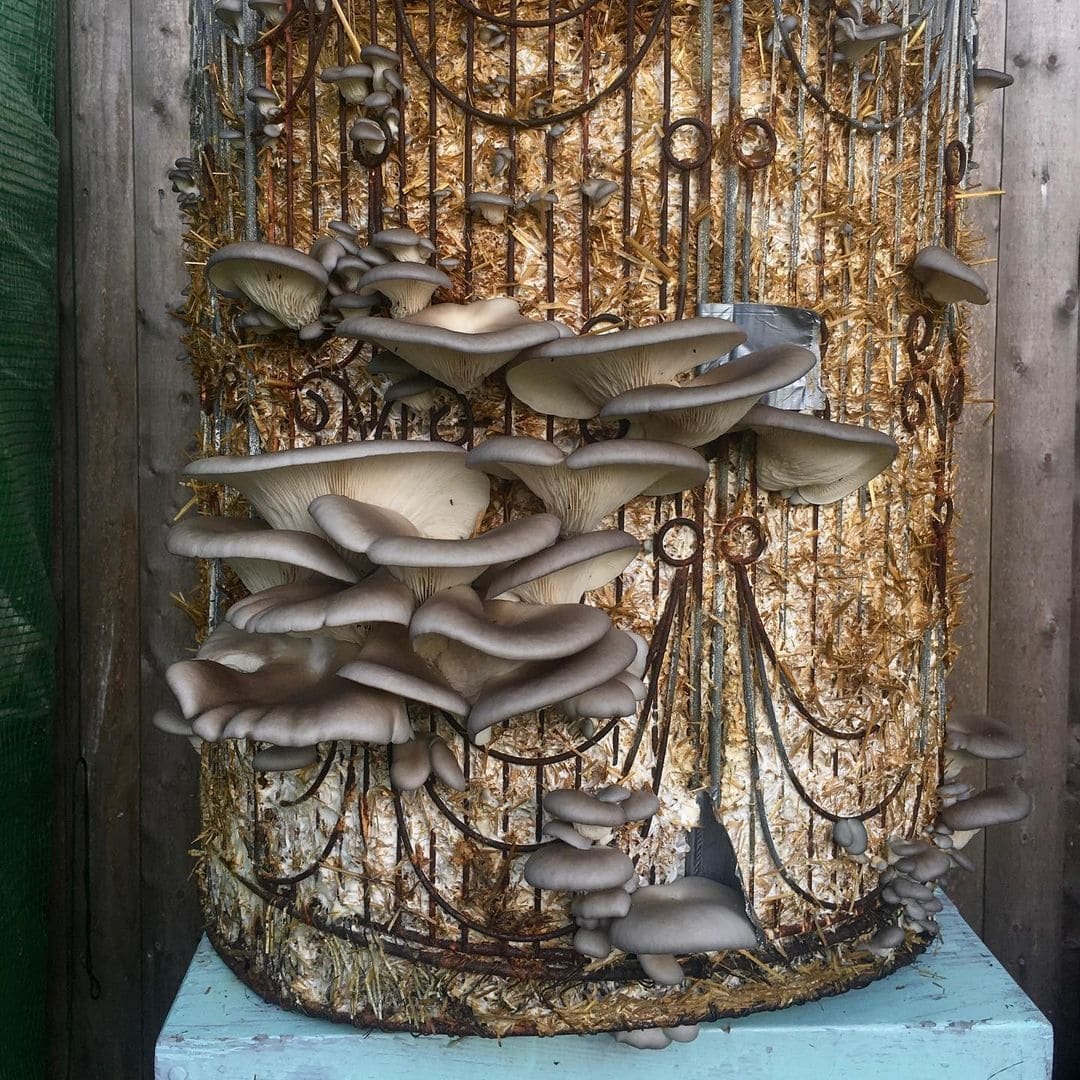


Substrate: Straw Bale
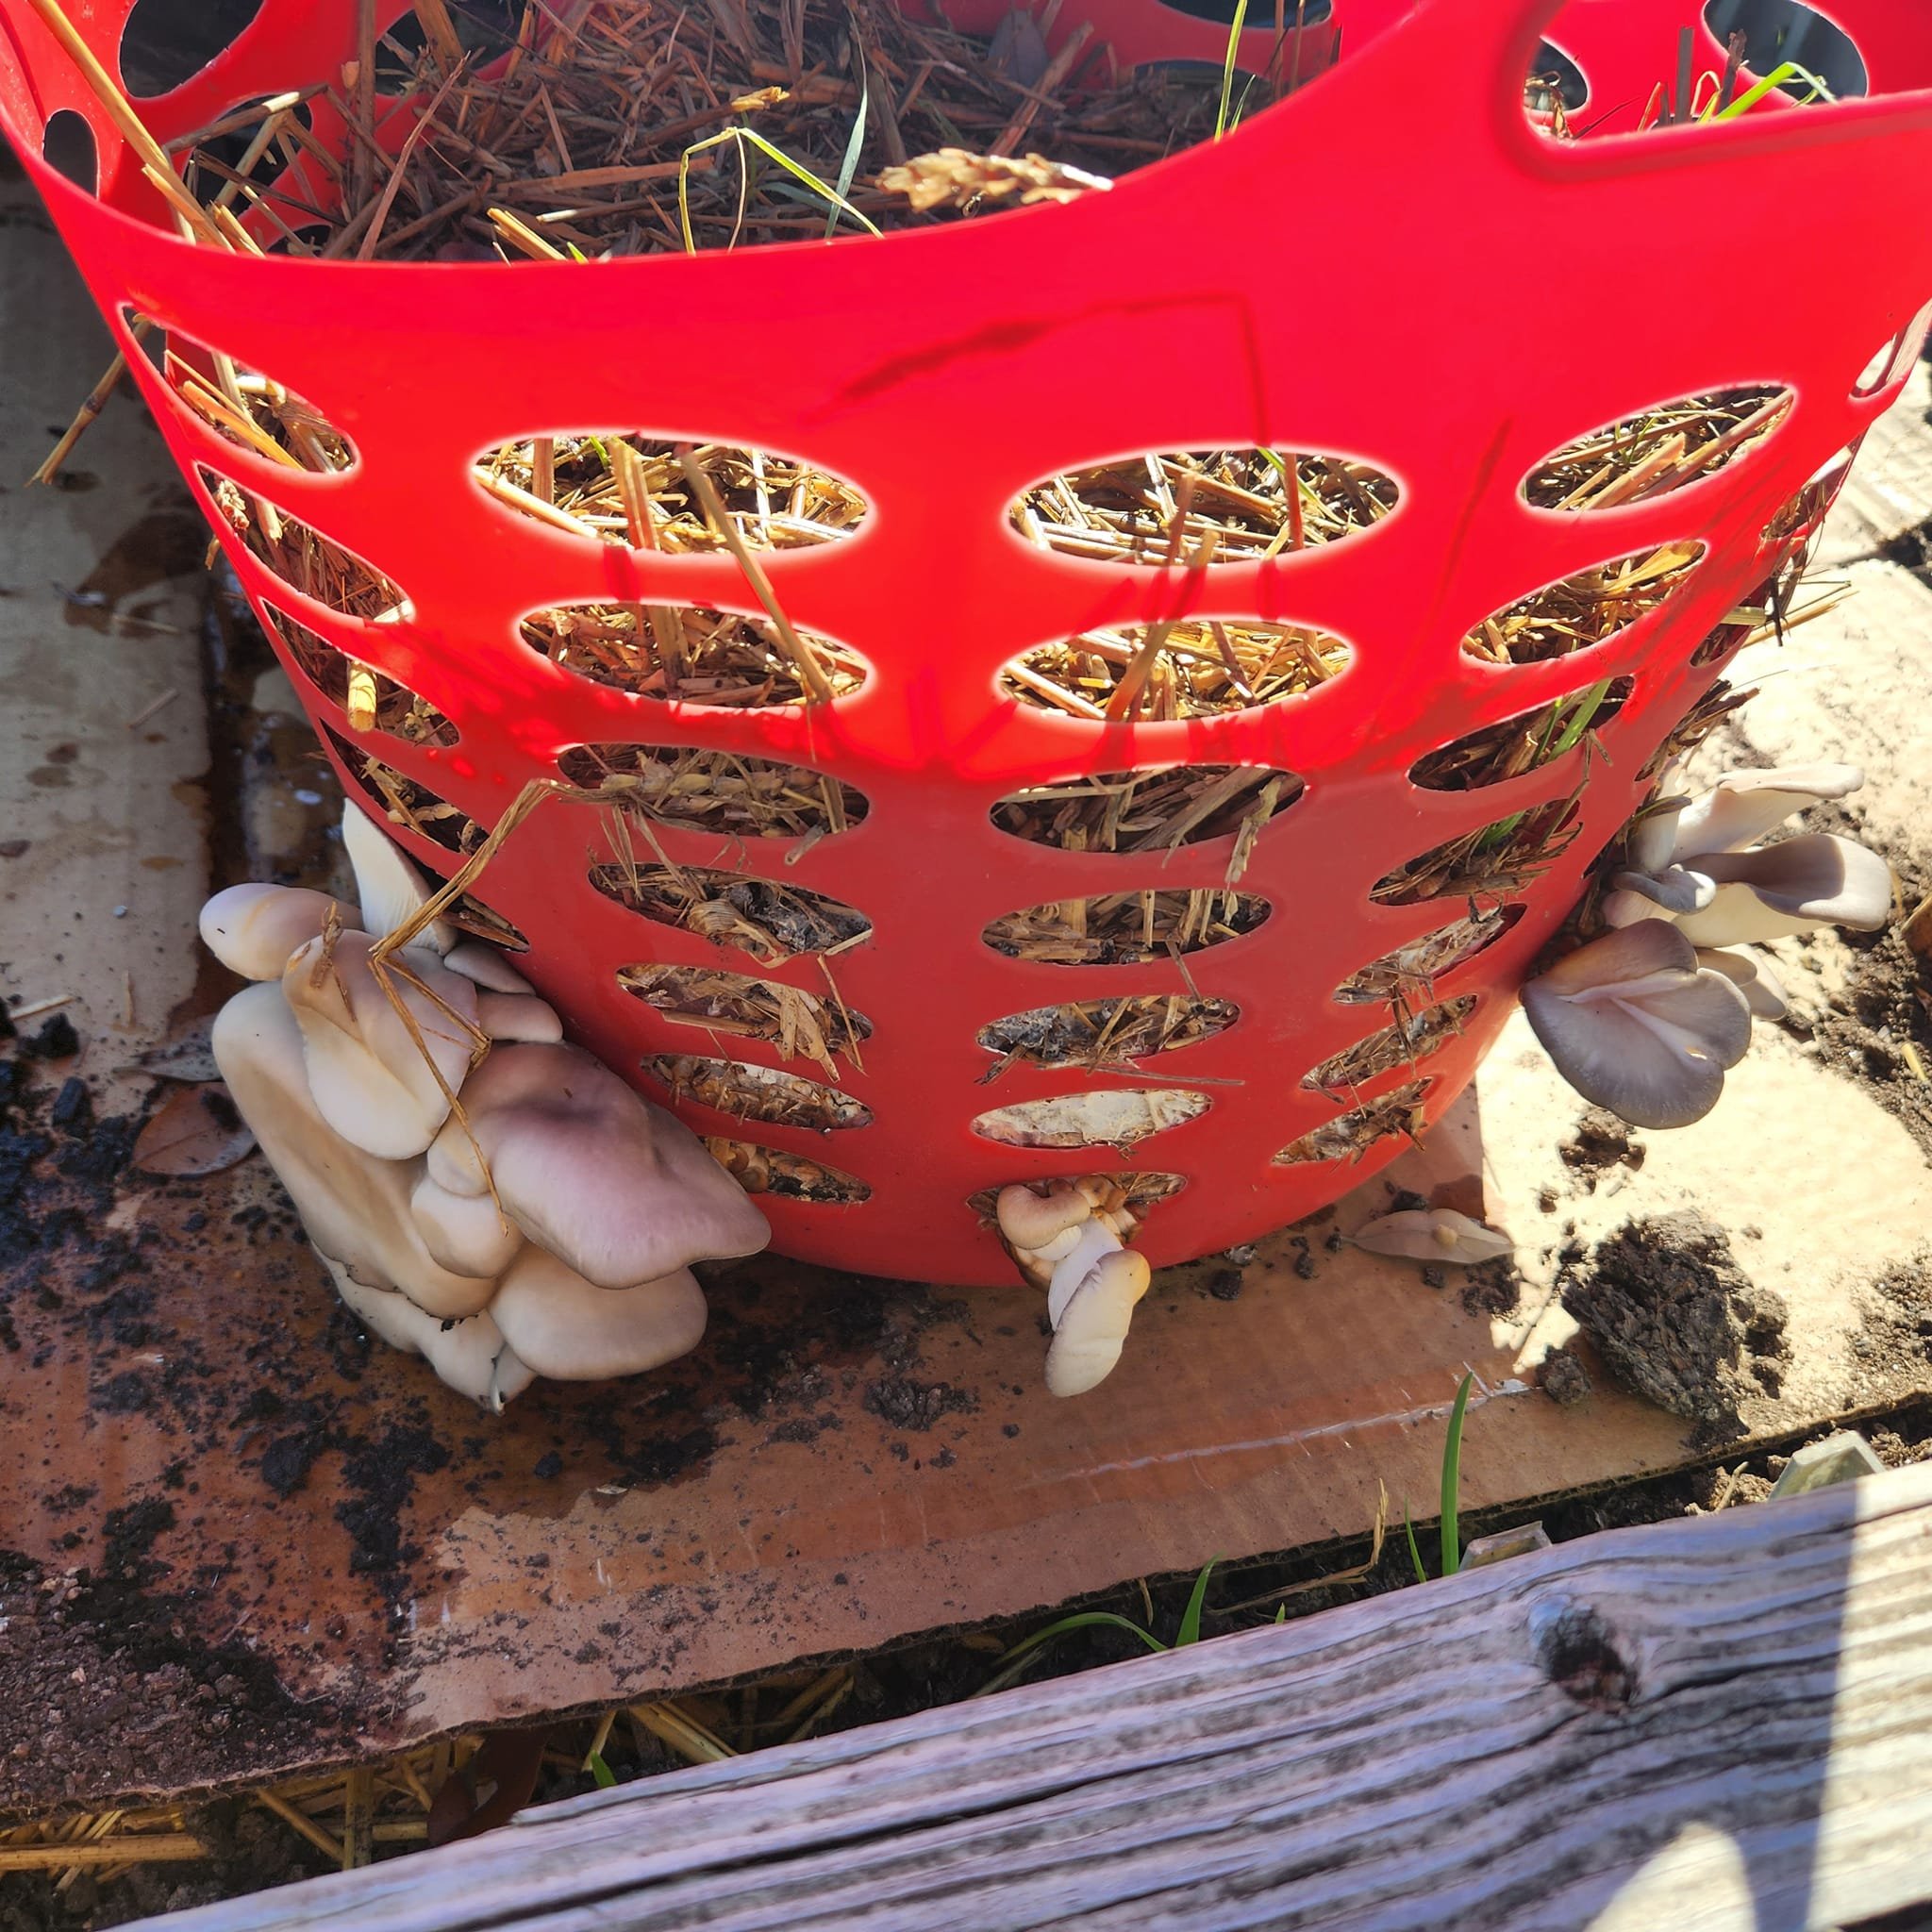
Container: 5 gallon bucket, planter pot, laundry basket, milk crate, or crate for vegetables, wire mesh container like a bird house, strawberry pot. Any container with holes in it will work. Do not buy anything new, there are many ways to recycle and use these materials.
Tools: Drill, Step drill bit, Alcohol, Soap & Water
Spawn: We recommend blue oysters spawn because it does best in a non-sterile environment.
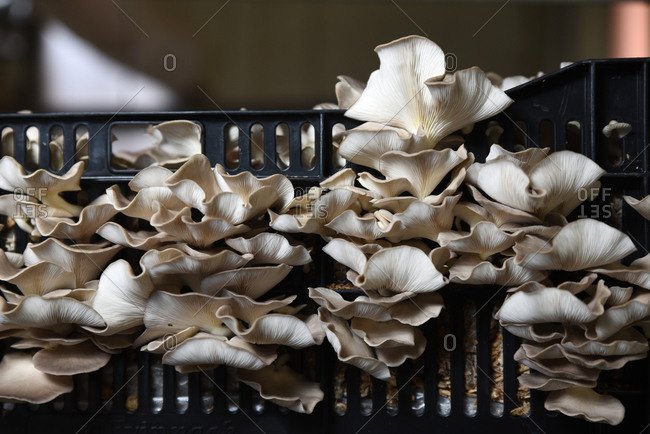
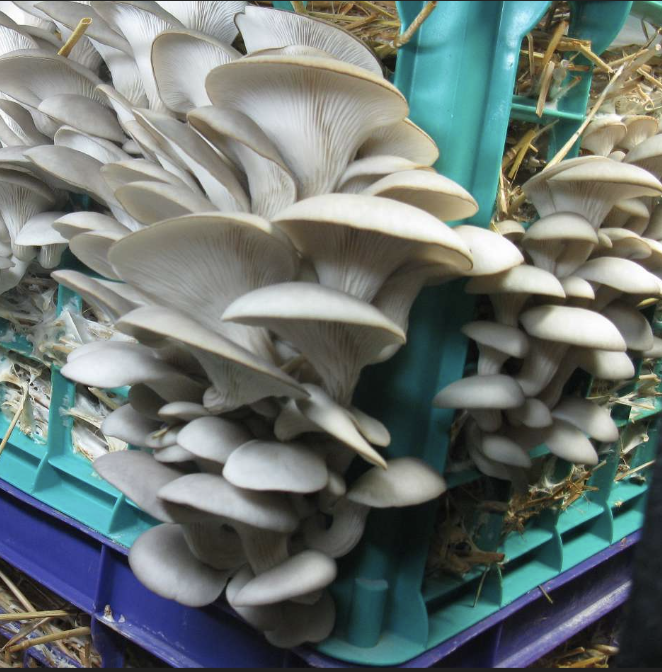
Oysters (Pleurotus ostreatus): Oyster mushrooms grow well outdoors and readily outgrow competitors and potential contaminants. This mushroom grows in several bright colors such as pink, blue, and yellow. Blue tends to be the best for growing outdoors. The taste of oyster mushrooms is very mild, and some describe it as subtly woody or like seafood. Oysters grow in partial shade and prefer straw to denser woody substrates.
GET MUSHROOM SPAWN FOR FREE
Many times mushroom farms have used sawdust blocks that have grown mushrooms once, and then end up getting tossed in the waste stream. Check with your local mushroom farm to see if you can help them reduce waste and use the spawn in your organic garden. If you are in Austin, we are collaborating with a new local mushroom farms to help keep used mushroom blocks out of the waste and help get them into gardens around Austin and building healthy soil!
The mushroom blocks are for free but you can also support our mission of helping the crew that is making sure they stay out of the waste by making a donation or becoming a member.
I’m NOT from Austin
I’m from Austin
GROWING STEPS
STEP 1: Soak substrate. Soak substrate for 2-5 hours so it becomes nice and hydrated, then drain. Oyster mushrooms are very robust and can do great on unpasteurized substrate regardless if it’s cleaned. Cold water lime pasteurization is recommended when temps are over 80 degrees.
STEP 2: Drill holes in your container. If your container doesn’t have holes in the side, make a few for drainage and for the mushrooms to emerge from. Drill in a diamond pattern about 6 inches apart. Do not drill holes in the bottom. Step drill bit of 1 or more inches is the best size.
STEP 3: Sterilize your container. Wash with soapy water and then with rubbing alcohol or hydrogen peroxide.
STEP 4: Mix the spawn and substrate. Mix spawn nicely with the substrate. 1 /4 spawn / substrate ratio is good but if you have an abundance 50/50 is good too. You can’t go wrong with more spawn.
STEP 5: Fill your Buckets. Make sure to leave a little breathing room for the oyster mushrooms, water.
STEP 6: Create Humidity Place a lid or piece of cardboard on top on to keep things moist. Cover the hole with micropore tape or simply put your bucket in a large cardboard box, plastic bag or an area where moisture is retained but air exchange can still happen.
STEP 7: Colonization During colonization you will want your container to be in a shady to dark place where moisture will be retained. For the next 3-4 weeks your bucket will colonize start to consume and eat the substrate.
STEP 8: Water once a week. Water as needed to keep the media from becoming dry and hard. Do the finger test and be sure you don’t overwater because this will cause mold to grow. If you see mold, scoop it out and spray area with hydrogen peroxide.
STEP 9: Pinning After 4-5 weeks you will start to see pins or baby mushrooms. At this point you want to make sure your container is getting as much oxygen as possible. Remove plastic bag or micropore tape. The bucket also needs light so it can absorb the UV and convert into Vitamin D. A dapple amount of light is enough.
STEP 10: Spritz Baby Mushrooms Spritz the mushroom as 2-3 times a day. The more the better. Mushrooms are 70% water just like humans so they need a lot of humidity.
STEP 10: Harvest After 4-5 days your mushroom will have grown to full size. Oyster mushrooms caps will start to uncurl and once they are fully uncurled you will want to harvest by twisting off at the whole or cutting with a clean knife. If you wait longer the mushrooms will spread their spores and they also get tough and woody texture. They can still be used in soups and stock at this point but they are the best texture after fruiting for 4-5 days.
RELATED videos in the series:
Part 1: How Fungi Benefits the Soil
Part 2: Grow Mushrooms on Wood Chips in The Garden
Part 3: Grow Mushrooms in a Straw Bale
Part 4: Grow Mushrooms in Containers
Part 5: Grow Mushrooms on Logs
Part 6: Grow Mushrooms using Trench Composting Method

PART 3: Grow Mushrooms in a Straw Bale
In traditional straw bale gardening, bales are “conditioned” by adding nitrogen-rich compost or manure to the bale to provide nutrients and initiate decomposition while growing veggies. You can use mushroom grain spawn in a similar way, and the fungi will facilitate the faster breakdown of the straw while growing mushrooms.
Mycology in the Garden
In traditional straw bale gardening, bales are “conditioned” by adding nitrogen-rich compost or manure to the bale to provide nutrients and initiate decomposition while growing veggies. You can use mushroom grain spawn in a similar way, and the fungi will facilitate the faster breakdown of the straw while growing mushrooms.
TIP: Be sure to use straw, not hay because the seeds will sprout and become weeds.
LOCATION
You'll want to place this in a shady spot that is protected from wind, and is within reach of your garden hose!
Materials Needed
Substrate: Straw Bale. Available in Austin at Callahan’s General Store for $12.
Spawn: Any Oyster Variety. This is the most important material you need for growing mushrooms is the spawn which is the equivalent of seeds. You can purchase bags of spawn from your local mushroom farm or buy it online for around $30. We Recommend: North Spore, Mushroom Mountain, and Field & Forest. Oysters (Pleurotus ostreatus): Oyster Mushrooms grow well outdoors and readily outgrow competitors and potential contaminants. This mushroom grows in several bright colors such as pink, blue, and yellow. Blue tends to be the best for growing outdoors. The taste of oyster mushrooms is very mild, and some describe it as subtly woody or like seafood. Oysters grow in partial shade and prefer straw to denser woody substrates.
Tools: Garden Fork, Spade, Pry Bar
GET MUSHROOM SPAWN FOR FREE
Many times mushroom farms have used sawdust blocks that have grown mushrooms once, and then end up getting tossed in the waste stream. Check with your local mushroom farm to see if you can help them reduce waste and use the spawn in your organic garden. If you are in Austin, we are collaborating with a new local mushroom farm Small Hold to help keep used mushroom blocks out of the waste and help get them into gardens around Austin and building more soil! Small Hold farms delicious, specialty mushrooms that are available for purchase at Central Market.
The mushroom blocks are for free but you can also support our mission of helping the crew that is making sure they stay out of the waste by making a donation or becoming a member.
I’m NOT from Austin
I’m from Austin
STEPS
Soak bale: Soak in water for a few hours. It will soak water up like a sponge. Use hot water if available to make for a cleaner substrate.
Inoculate Straw: After the straw has drained, disperse spawn evenly on all sides of the bale, getting as close to the center as possible. It’s helpful to use a spade, or garden fork to get deeper into the bale. We even used a pry bar to loosen it up. Use one 5 lb bag of spawn for one straw bale.
Watering: While the mycelium spreads, be sure to keep the bale hydrated, lightly watering when you water your vegetables. After 7-14 days you will start to see mycelium colonize the straw.
Keep the Bale Cool: Once temperatures exceed 80 degrees, the bale may get too hot for mycelial growth. Try placing in the shade or use shade cloth. You can also inoculate with more spawn to keep your mushrooms growing as temperatures rise.
Harvest and Enjoy: Time to harvest will likely be about 10-21 days depending on the oyster species.Try to harvest your oyster mushrooms right before they drop spores. You will know they are ready to drop spores when the caps start to curl upwards. Remove the mushroom cluster from your bale at the base of the cluster with a knife, or simply twist off with your hand.
Mulch Your Vegetables: After a year or less, the straw will be decomposed, great as worm food, compost, or as mulch for your vegetables.
RELATED videos in the series:
Part 1: How Fungi Benefits the Soil
Part 2: Grow Mushrooms on Wood Chips in The Garden
Part 3: Grow Mushrooms in a Straw Bale
Part 4: Grow Mushrooms in Containers
Part 5: Grow Mushrooms on Logs
Part 6: Grow Mushrooms using Trench Composting Method

February Member Giveaway
Become a member of CTMS and be entered in a win a Grow-At-Home Oyster Kit !
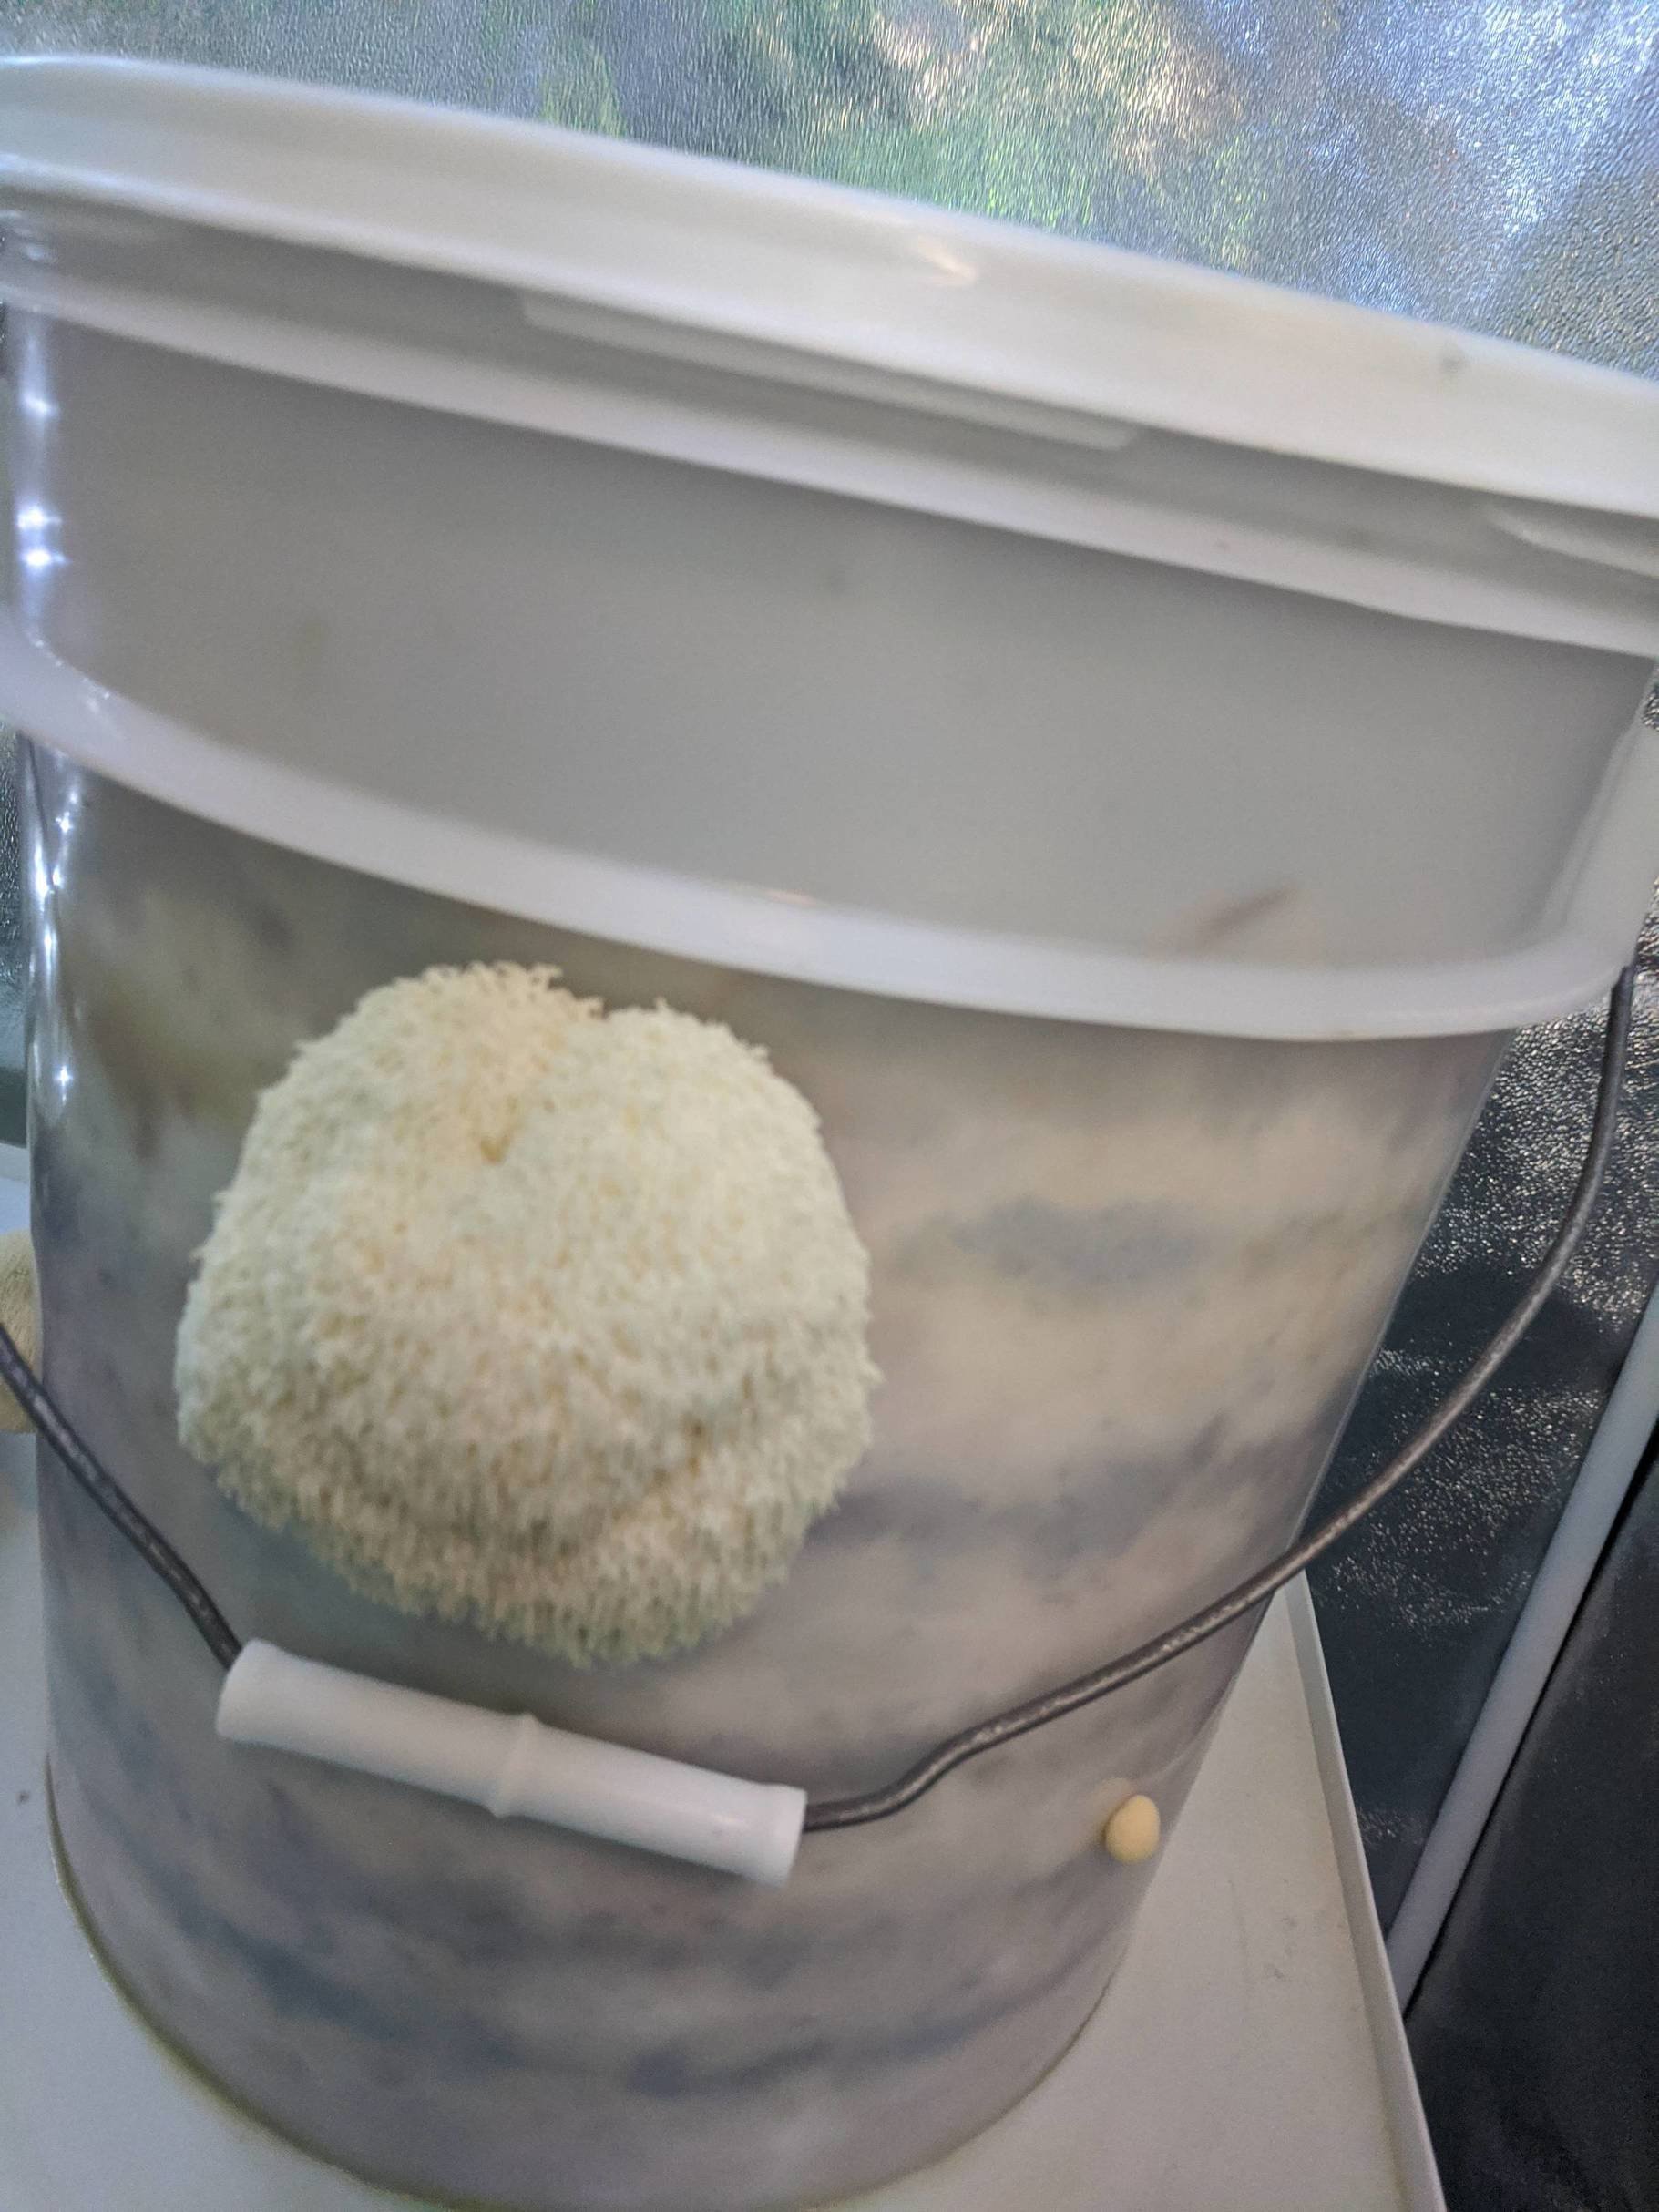
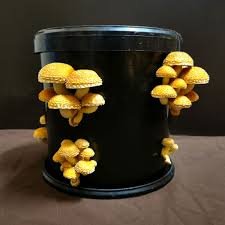
Hi-Fi Myco is Austin’s first urban mushroom farm. This month's feature mushroom giveaway is the Lion’s mane, Hericium erinaceus.
Hi-Fi Myco Oyster Mushrooms
Grow-Your-Own Lion’s Mane Kit from Hi-Fi-Myco
Hi-Fi Myco is Austin’s first urban mushroom farm. This month's feature mushroom giveaway is the Lion’s mane, Hericium erinaceus. This mushroom grows in the wild in Central Texas on post oaks in the winter and is also cultivated. Here's a photo of one foraged by @forage.atx this past December. A small piece of this wild mushroom is hanging out in the fridge at Hi-Fi Myco successfully cloned! It can be identified by its long spines, occurrence on post oak hardwoods, and it is both culinary and medicinal. Its flavor may be compared to that of lobster with a scallop texture. It is great seared used in place of crab meat to make crab cakes. Lion’s mane has many of the nutritional benefits as other mushrooms, immune boosting, anti-carcinogen, much like the other adaptogens listed, this one really targets brain function. Lion’s mane can improve memory, boost cognition and focus, and protects against concussions and brain damage.
Lion’s mane mushrooms are available for purchase on their website for pick-up at the following Farmers Markets: Lakeline, Sunset Valley, Downtown, New Braunfels, and Mueller.
Become a member of CTMS and be entered in a win a Grow-At-Home Pink Oyster Kit ! (Winner will be announced in January.)

Part 2: How to Grow Mushrooms in Your Garden
In this six part Mycology in the Garden video series, we will show you five low-cost and low-tech ways to grow edible mushrooms outdoors in shady areas where plants would not thrive. You can grow them alongside your vegetables, perennials, or in the shade of trees. These basic techniques require no special equipment or electricity, and can all be done outdoors using organic materials found such as straw, leaves, wood chips and logs which all make for great mushroom substrate.
Mycology in the Garden
In this six part Mycology in the Garden video series, we will show you five low-cost and low-tech ways to grow edible mushrooms outdoors in shady areas where plants would not thrive. You can grow them alongside your vegetables, perennials, or in the shade of trees. These basic techniques require no special equipment or electricity, and can all be done outdoors using organic materials found such as straw, leaves, wood chips and logs which all make for great mushroom substrate.
WHEN TO GROW MUSHROOMS OUTDOORS
Late Fall or Winter into early Spring is the best time in Texas to grow mushrooms outdoors. Typically mushrooms fruit after the rain and require high humidity and temperatures between 55 and 75°F depending on the species. It’s best to try to time it up with the seasons that mushrooms grow in nature and with the rain that usually comes in the fall and spring. If you are unsure of when certain mushroom fruit is in the wild, you can use the app iNaturalist. Just search for a mushroom species, location, and filter by dates.
WHAT MATERIALS ARE NEEDED
Substrate: You will need wood chips, straw and leaves as your growing substrate to feed the fungi with the nutrients they need to fruit a mushroom. Soft wood chips are preferred and avoid using conifers or pines like the loathed juniper or cedar tree.
Cardboard & Hardwood Logs: (optional)
Mushroom Spawn: The most important material you need for growing mushrooms is the spawn which is the equivalent of seeds. You can purchase bags of spawn from your local mushroom farm or buy it online for around $30. We Recommend: North Spore, Mushroom Mountain, and Field & Forest. We recommend the following mushroom spawn because they are delicious and do not require a sterile environment to grow.
Wine Caps, King Stropharia, Garden Giant (Stropharia raguso-annulata): The Wine Cap is one of the easiest mushrooms to grow outdoors and sometimes grows as large as a plate. It helps in building soil, retaining water and helping your plants thrive, creating a symbiotic environment. Wine Cap mushrooms are crisp with a mild, earthy, and nutty flavor with hints of potatoes and red wine. This mushroom grows best partial shade but can tolerate some direct sun and grows well in straw and soft wood chips.
Oysters (Pleurotus ostreatus): Oyster Mushrooms grow well outdoors and readily outgrow competitors and potential contaminants. This mushroom grows in several bright colors such as pink, blue, and yellow. Blue tends to be the best for growing outdoors. The taste of oyster mushrooms is very mild, and some describe it as subtly woody or like seafood. Oysters grow in partial shade and prefer straw to denser woody substrates.
Blewits (Clitocybe nuda): Blewits are a lavender purple mushroom that can be found naturally fruiting during the fall and winter months in Texas. They need a heavy frost or freeze to initiate fruiting, so Blewits will not fruit in tropical climates below Central Texas. Fresh wood blewits are great with eggs in breakfast tacos. They prefer growing in composted leaves, manure and straw.
GET MUSHROOM SPAWN FOR FREE
Many times mushroom farms have used sawdust blocks that have grown mushrooms once, and then end up getting tossed in the waste stream. Check with your local mushroom farm to see if you can help them reduce waste and use the spawn in your organic garden. If you are in Austin, we are collaborating with a new local mushroom farm Small Hold to help keep used mushroom blocks out of the waste and help get them into gardens around Austin and building more soil! Small Hold farms delicious, specialty mushrooms that are available for purchase at Central Market.
The mushroom blocks are for free but you can also support our mission of helping the crew that is making sure they stay out of the waste by making a donation or becoming a member.
I’m From Austin
I’m NOT from Austin
HOW TO GET STARTED
STEP 1: Choose an Area
Find a shady area and keep in mind that one 5 lb bag of spawn can inoculate a 16 square foot area. If you are making a new bed, you can add a hardwood log frame around the bed. You can even use inoculated logs, which we will show you how to do as well in a later video. You can also use the footpaths in your garden to create more organic matter and suppress weed growth. Or you can use an existing garden bed that is already mulched or one that needs fertilization and more organic material. Also choose an area close to water either from irrigation or natural water flow. An area where water flows slightly downhill, pools up, or where you might have nitrogen-rich run-off from livestock is also a good area.
STEP 2: Cover Area with Cardboard
If there is a lot of vegetation growing in the area, cover the entire ground with cardboard from flattened boxes that have tape removed. Water the cardboard until it is saturated.
STEP 3: Add Mushroom Spawn
Next you will need to sprinkle the mushroom spawn lightly onto the cardboard.
STEP 4: Add 3” of Substrate
Now add 3” of substrate and mix in a generous amount of spawn. Remember wine caps like wood chips and oysters like straw. While wood chips work well in paths and around perennials, we recommend using straw mulch in vegetable beds. As it decomposes, straw uses up fewer nutrients in the soil than wood chips.
STEP 5: Compact the surface
Pack the surface to get rid of any air pockets. Avoid branches or other very large pieces of wood as these take longer to colonize and can create too much air space.
STEP 6: Water the Area
Next you will sprinkle lightly with water.
STEP 7: Add Layer of Torn up Cardboard
Add another layer of torn up cardboard, so that the moisture can make it to the bottom layer.
STEP 8: Add More Spawn and Wood chips
Repeat steps 3 and 4, until you have reached a height of a little less than 6”.
STEP 9: Cover with straw or leaves
Cover with straw or leaves to a depth of 1-2” to help preserve moisture and to shade the substrate.
WATERING SCHEDULE
Water every day for the first week, every other day for the 2nd – and then the same amount you water your vegetable garden. Don’t let your mushroom bed dry out! The first few weeks are critical, while the mycelium spreads. You don’t want soaking wet, because it creates an anaerobic environment where bacteria flourish. You can also cover your wood chips with straw to act as a mulch layer for moisture retention. Or, a tarp or other plastic sheeting can be used to prevent the bed from drying out. This is useful for straw beds or in especially hot or dry climates.
MAINTENANCE & HARVEST
Once established, mushroom beds require little maintenance outside of occasional watering during droughts. You can check on your bed every week or so to monitor moisture levels and how well the mycelium is growing. Once the mycelium has completely grown through the chips, you may notice tiny mushrooms, or pins, forming. If you’ve covered your bed with a tarp or plastic, that’s a cue to remove it so mushrooms can form.
The growing process can take anywhere between 4 weeks to a few months after inoculation, depending on your climate, substrate, and how heavily you spawned. After mushrooms fruit they will spread their spores and the cycle starts over again. Fresh woody material can be added each year to maintain the health of the bed, and give it some extra food to eat. ALWAYS properly identify the mushroom before you eat it.
You can also take some of the inoculated material from one bed and use it as spawn to inoculate new beds, or you can pass it along to a friend like a sourdough starter. Keep spreading the spores!
RELATED videos in the series:
Part 1: How Fungi Benefits the Soil
Part 2: Grow Mushrooms on Wood Chips in The Garden
Part 3: Grow Mushrooms in a Straw Bale
Part 4: Grow Mushrooms in Containers
Part 5: Grow Mushrooms on Logs
Part 6: Grow Mushrooms using Trench Composting Method

Part 1: How Fungi Benefits Soil
This video is part one of a series about growing mushrooms in the garden outdoors. Fungi Are Great Recyclers: One billion years ago, the fungi kingdom began decomposing, carbon rich, hard-to-digest organic matter into forms that other organisms can use. We would not have the soil that we walk on today if not for the fungi kingdom. Growing mushrooms in the garden helps decompose common organic matter faster, while growing a food source.
Mycology in the Garden
This video is part one of a series about growing mushrooms in the garden outdoors.
BENEFITS:
1. Fungi Are Great Recyclers: One billion years ago, the fungi kingdom began decomposing, carbon rich, hard-to-digest organic matter into forms that other organisms can use. We would not have the soil that we walk on today if not for the fungi kingdom. Growing mushrooms in the garden helps decompose common organic matter faster, while growing a food source.
2. Fungi Feeds Soil Food Web: This organic matter in turn feeds all of the living things in the soil food web, your plants, and eventually you when mushrooms fruit.
3. Fungi Distribute Water & Nutrients: Mycelium, the web-like threads underneath the soil, form a communication network, sometimes called the wood-wide-web which distribute nutrients and water. This web beneath our feet, connects vast systems of roots from plants and trees all over the planet. 90%+ of plants form mycorrhizal relationships with fungi.
4. Fungi Holds Soil Together: Mycelium physically binds soil particles together, creating stability that helps increase water infiltration and soil water holding capacity.
5. Builds Immunity: Evidence suggests that mushrooms support healthy immune response, lower inflammation and, through interaction with the gut microbiome, improved immune cell functionality. This is true not just for humans but also animals and insects. Mushroom extracts have been shown to improve the immunity of bees that are in danger of collapsing because of the varroa mite parasite.
RELATED videos in the series:
Part 1: How Fungi Benefits the Soil
Part 2: Grow Mushrooms on Wood Chips in The Garden
Part 3: Grow Mushrooms in a Straw Bale
Part 4: Grow Mushrooms in Containers
Part 5: Grow Mushrooms on Logs
Part 6: Grow Mushrooms using Trench Composting Method
Part 7: Composting with Mushroom Blocks
Part 8: Sheet Mulching with Mushroom Mycelium Blocks
Sign up to get recycled mushroom blocks for your garden
SUPPORT OUR MISSION: Become a member and support our mission of mycology education.

January Featured Mushroom & Giveaway
Become a member of CTMS and be entered in a win a Grow-At-Home Oyster Kit !
Hi-Fi Myco is Austin's first urban mushroom farm. This month's feature mushroom and giveaway is the local cloned variety of oyster mushroom Pleurotus ostreatus.
This month there are two giveaways!

In early February we start this book by Anna Lowenhaupt Tsing in the online bookclub. We meet twice a month on Sunday evenings. The book is about the rare Matsutake mushroom and what it can teach us about sustaining life on a fragile planet. If you would like to become a member of our bookclub, send a note to info@centraltexasmycology.org to be added.
Become a member and be entered to win this book!
Winner will be announced at the beginning of February.

Hi-Fi Myco is Austin's first urban mushroom farm. This month's feature mushroom and giveaway is the local cloned variety of oyster mushroom Pleurotus ostreatus. The mushroom's taste has been described as mild with a slight odor similar to anise. The oyster mushroom is frequently used in Japanese, Korean and Chinese cookery as a delicacy. It is frequently served on its own, in soups, stuffed, or in stir-fry recipes with soy sauce. Oyster mushrooms are sometimes made into a sauce, used in Asian cooking, which is similar to oyster sauce. Oyster mushrooms are available for purchase on their website for pick-up at the following Farmers Markets: Lakeline, Sunset Valley, Downtown, New Braunfels, and Mueller.
Become a member of CTMS and be entered in a win a Grow-At-Home Pink Oyster Kit !
Winner will be announced in February.

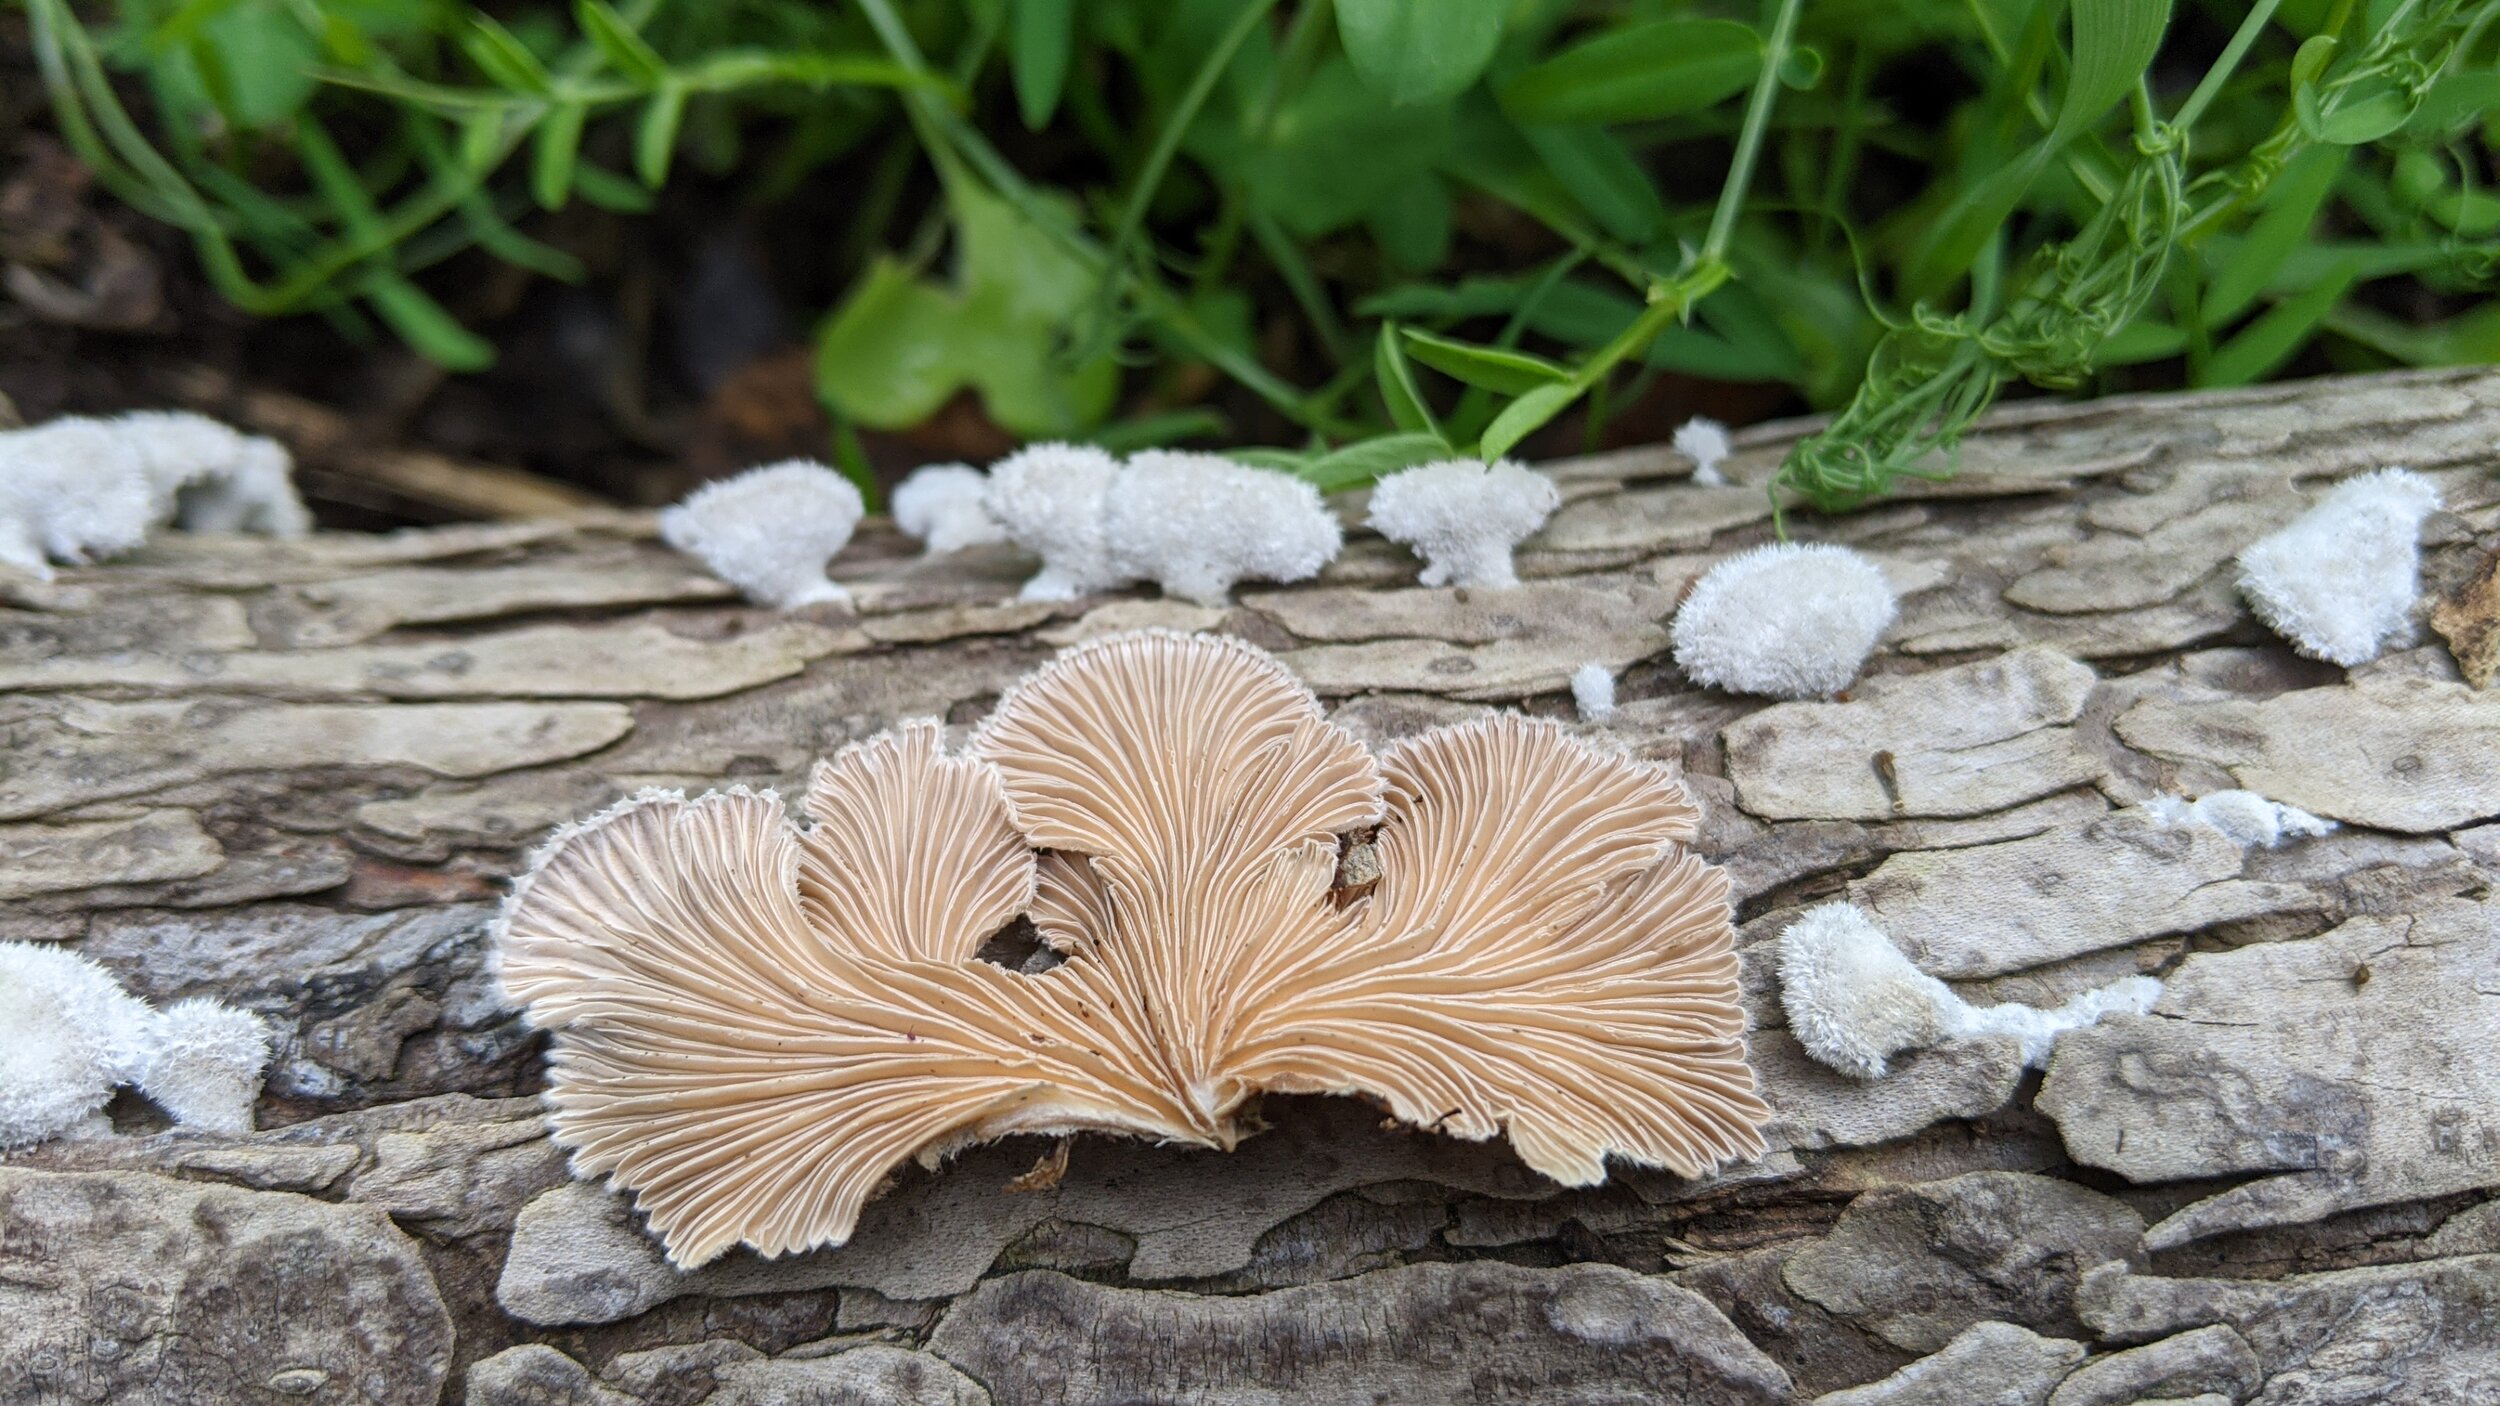
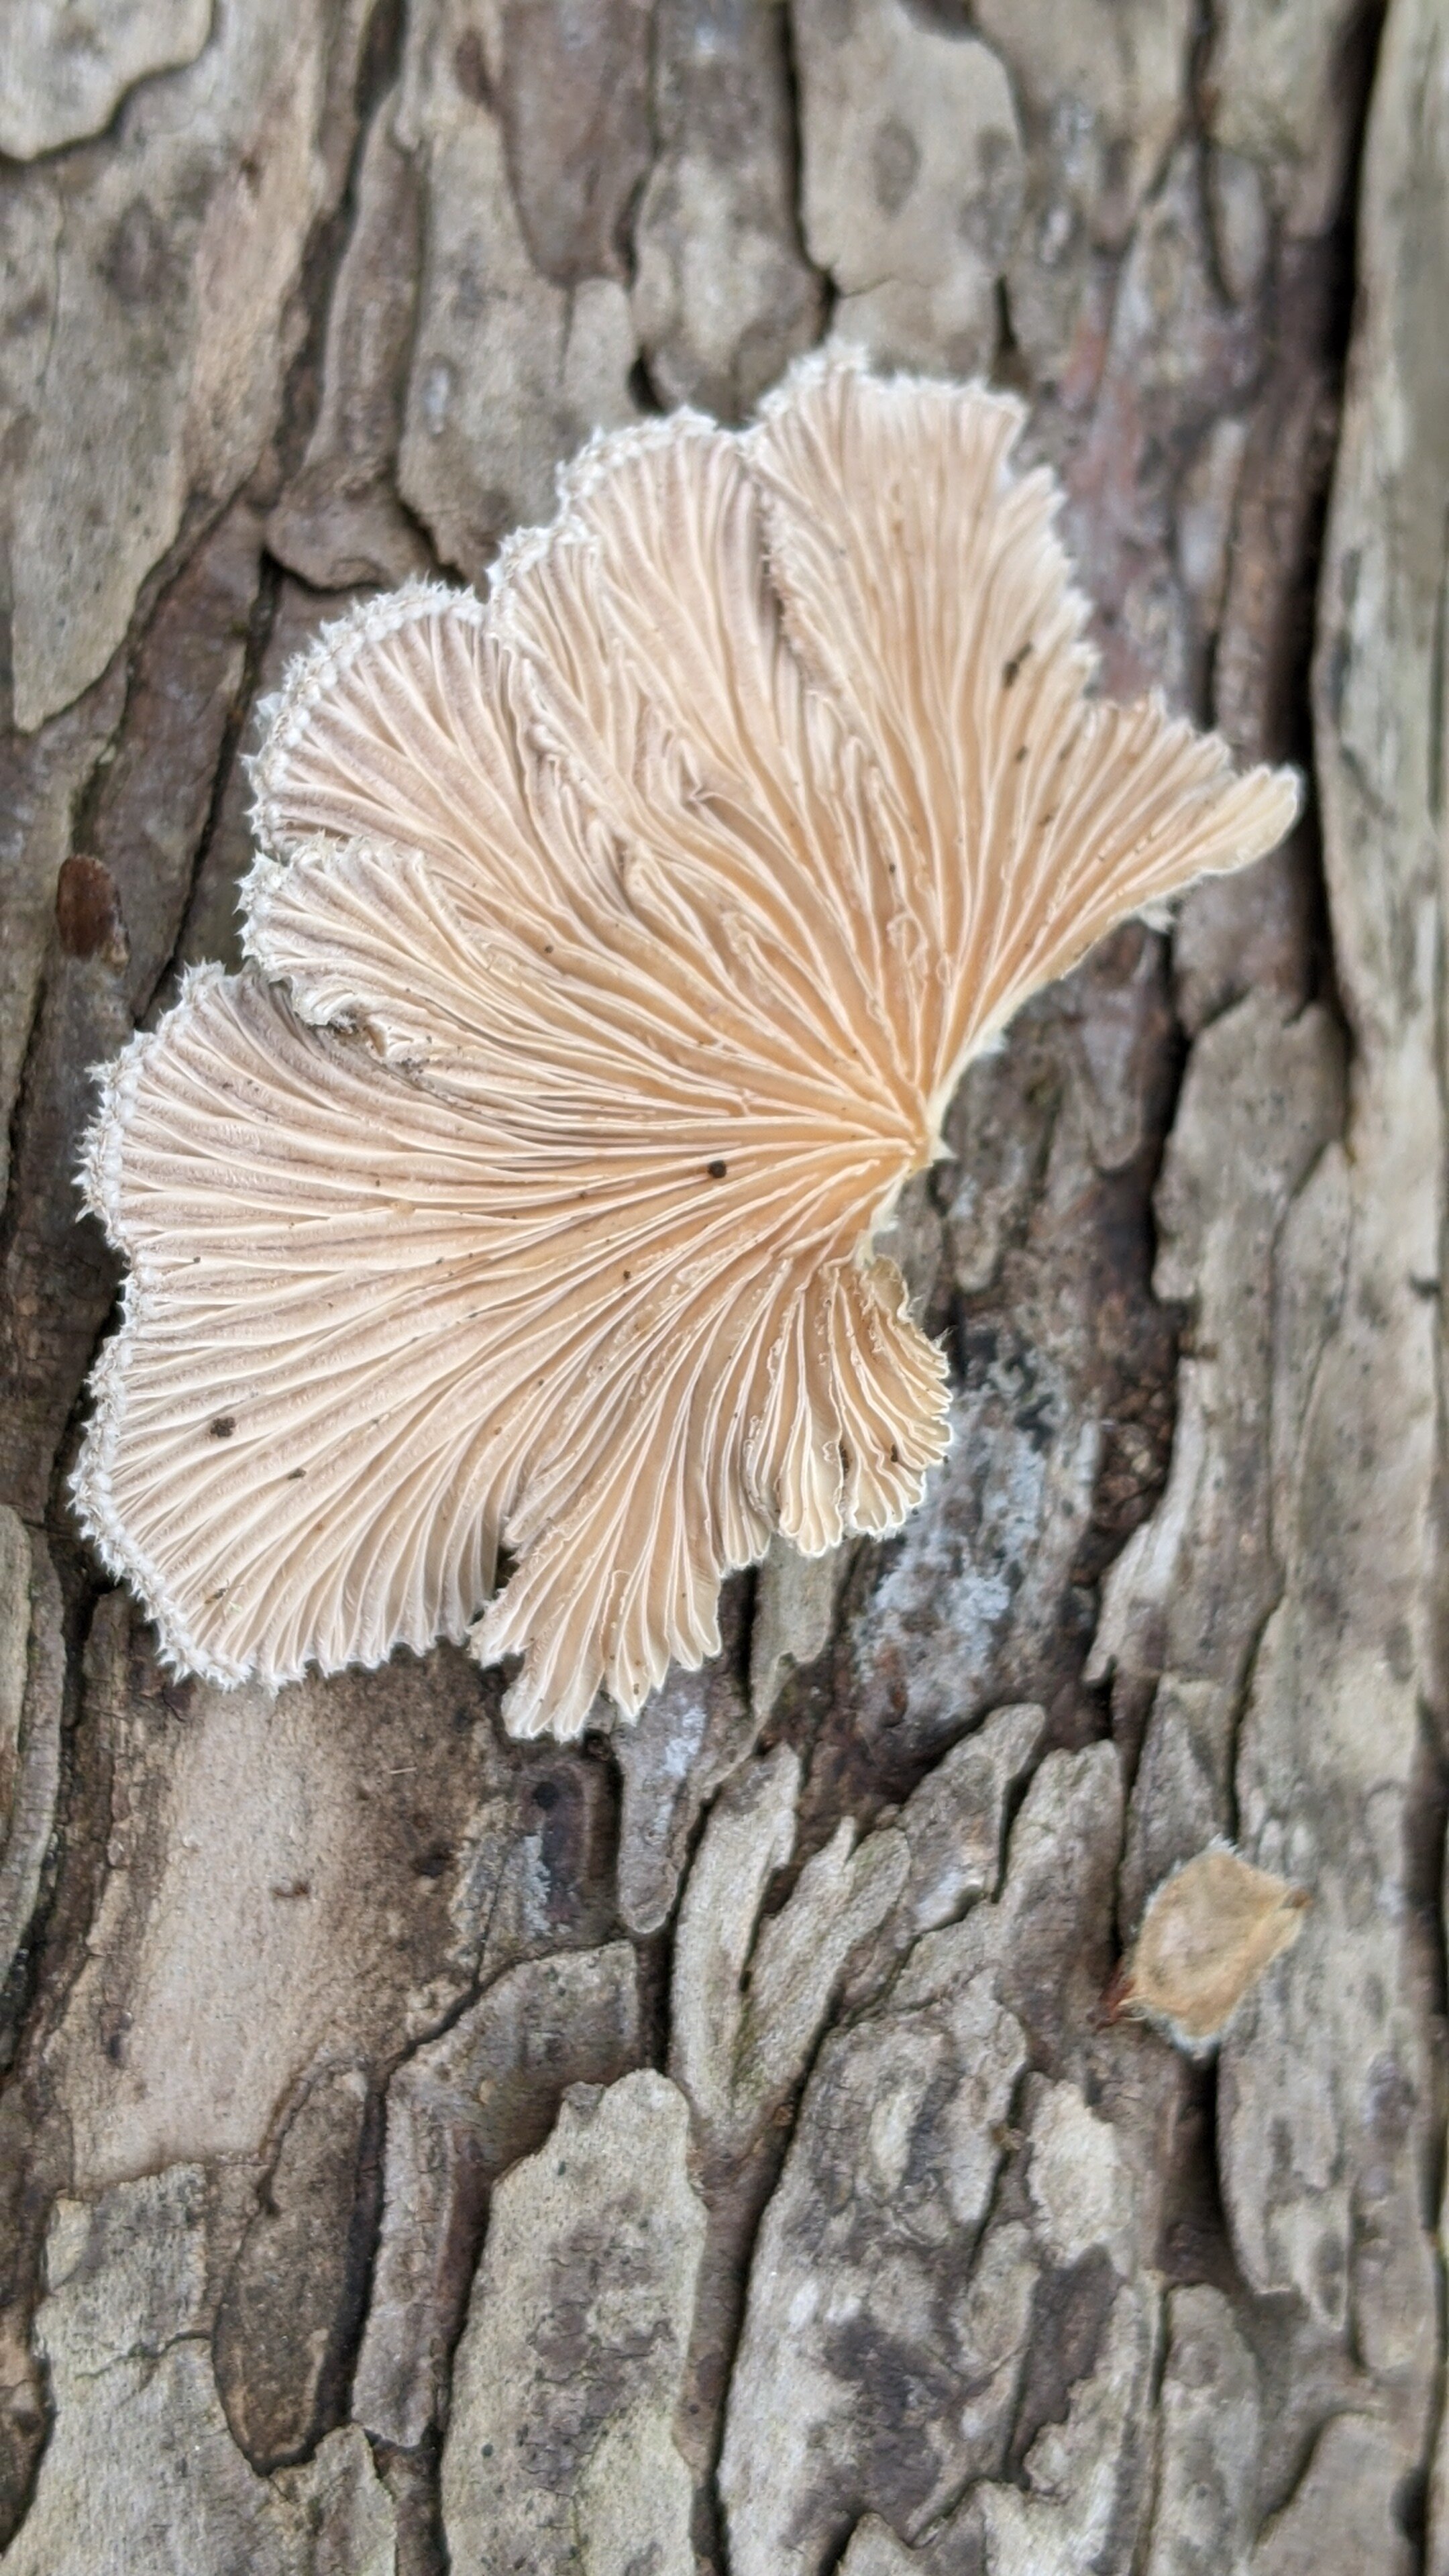
PHOTOS: Split Gill Mushroom, Schizophyllum commune
The Split Gill Mushroom, Schizophyllum commune was one of the beautiful mushrooms we spotted on the foray to kick-off the Zilker Mushroom Project this past weekend. It is super common and can be found decomposing logs and stumps. It can even dehydrate and rehydrate. The real show are the split gills on the underside of the mushroom.
The Split Gill Mushroom, Schizophyllum commune was one of the beautiful mushrooms we spotted on the foray to kick-off the Zilker Mushroom Project this past weekend. It is super common and can be found decomposing logs and stumps. It can even dehydrate and rehydrate. The real show are the split gills on the underside of the mushroom.
One of the most interesting things about S. commune is its system of sexual reproduction. Split Gill has acquired some genetic changes that give it a total of over 28,000 distinct sexes.
Don't get too close and sniff this mushroom tho. This fungi can colonize within human bodies!
Over the past several decades, numerous reports of infection caused by the Split Gill fungus have been reported in the medical literature. The most recent case study from an outpatient center involved a 25-year-old woman whose left foot showed symptoms of rashes, nodule formation, lesions, and pain. A skin biopsy was performed, and the isolated hyphae (fungal strands) were cultured for 7 days. DNA sequencing confirmed the culprit: the Split Gill fungus — Schizophyllum commune. (BMC Infectious Diseases, 2018.)
Since 1950, close to 100 cases of Schizophyllum-induced clinical disease have been reported in the literature. Illnesses include: sinusitis, allergic bronchopulmonary mycosis, bronchial mucoid impaction, pulmonary fungal ball, Schizophyllum asthma, pulmonary infiltrate with eosinophilia, chronic eosinophilic pneumonia, honeycomb lung, bronchogenic cysts, pulmonary nodules, and other pulmonary mycoses.
As you can see, the majority of infections target the lungs. Inhalation of spores seems to be a likely cause.
Despite all this, the Split Gill mushroom is used as a food, medicine, and tool for bioremediation around the world. This mushroom isn't commonly consumed in the US but in places like Mexico and elsewhere in the tropics. In Northeast India, in the state Manipur it is known as kanglayen and one of the favourite ingredients for Manipuri-style pancakes called paaknam. In Mizoram, the local name is pasi (pa means mushroom, si means tiny) and it is one of the highest rated edible mushrooms among the Mizo community.
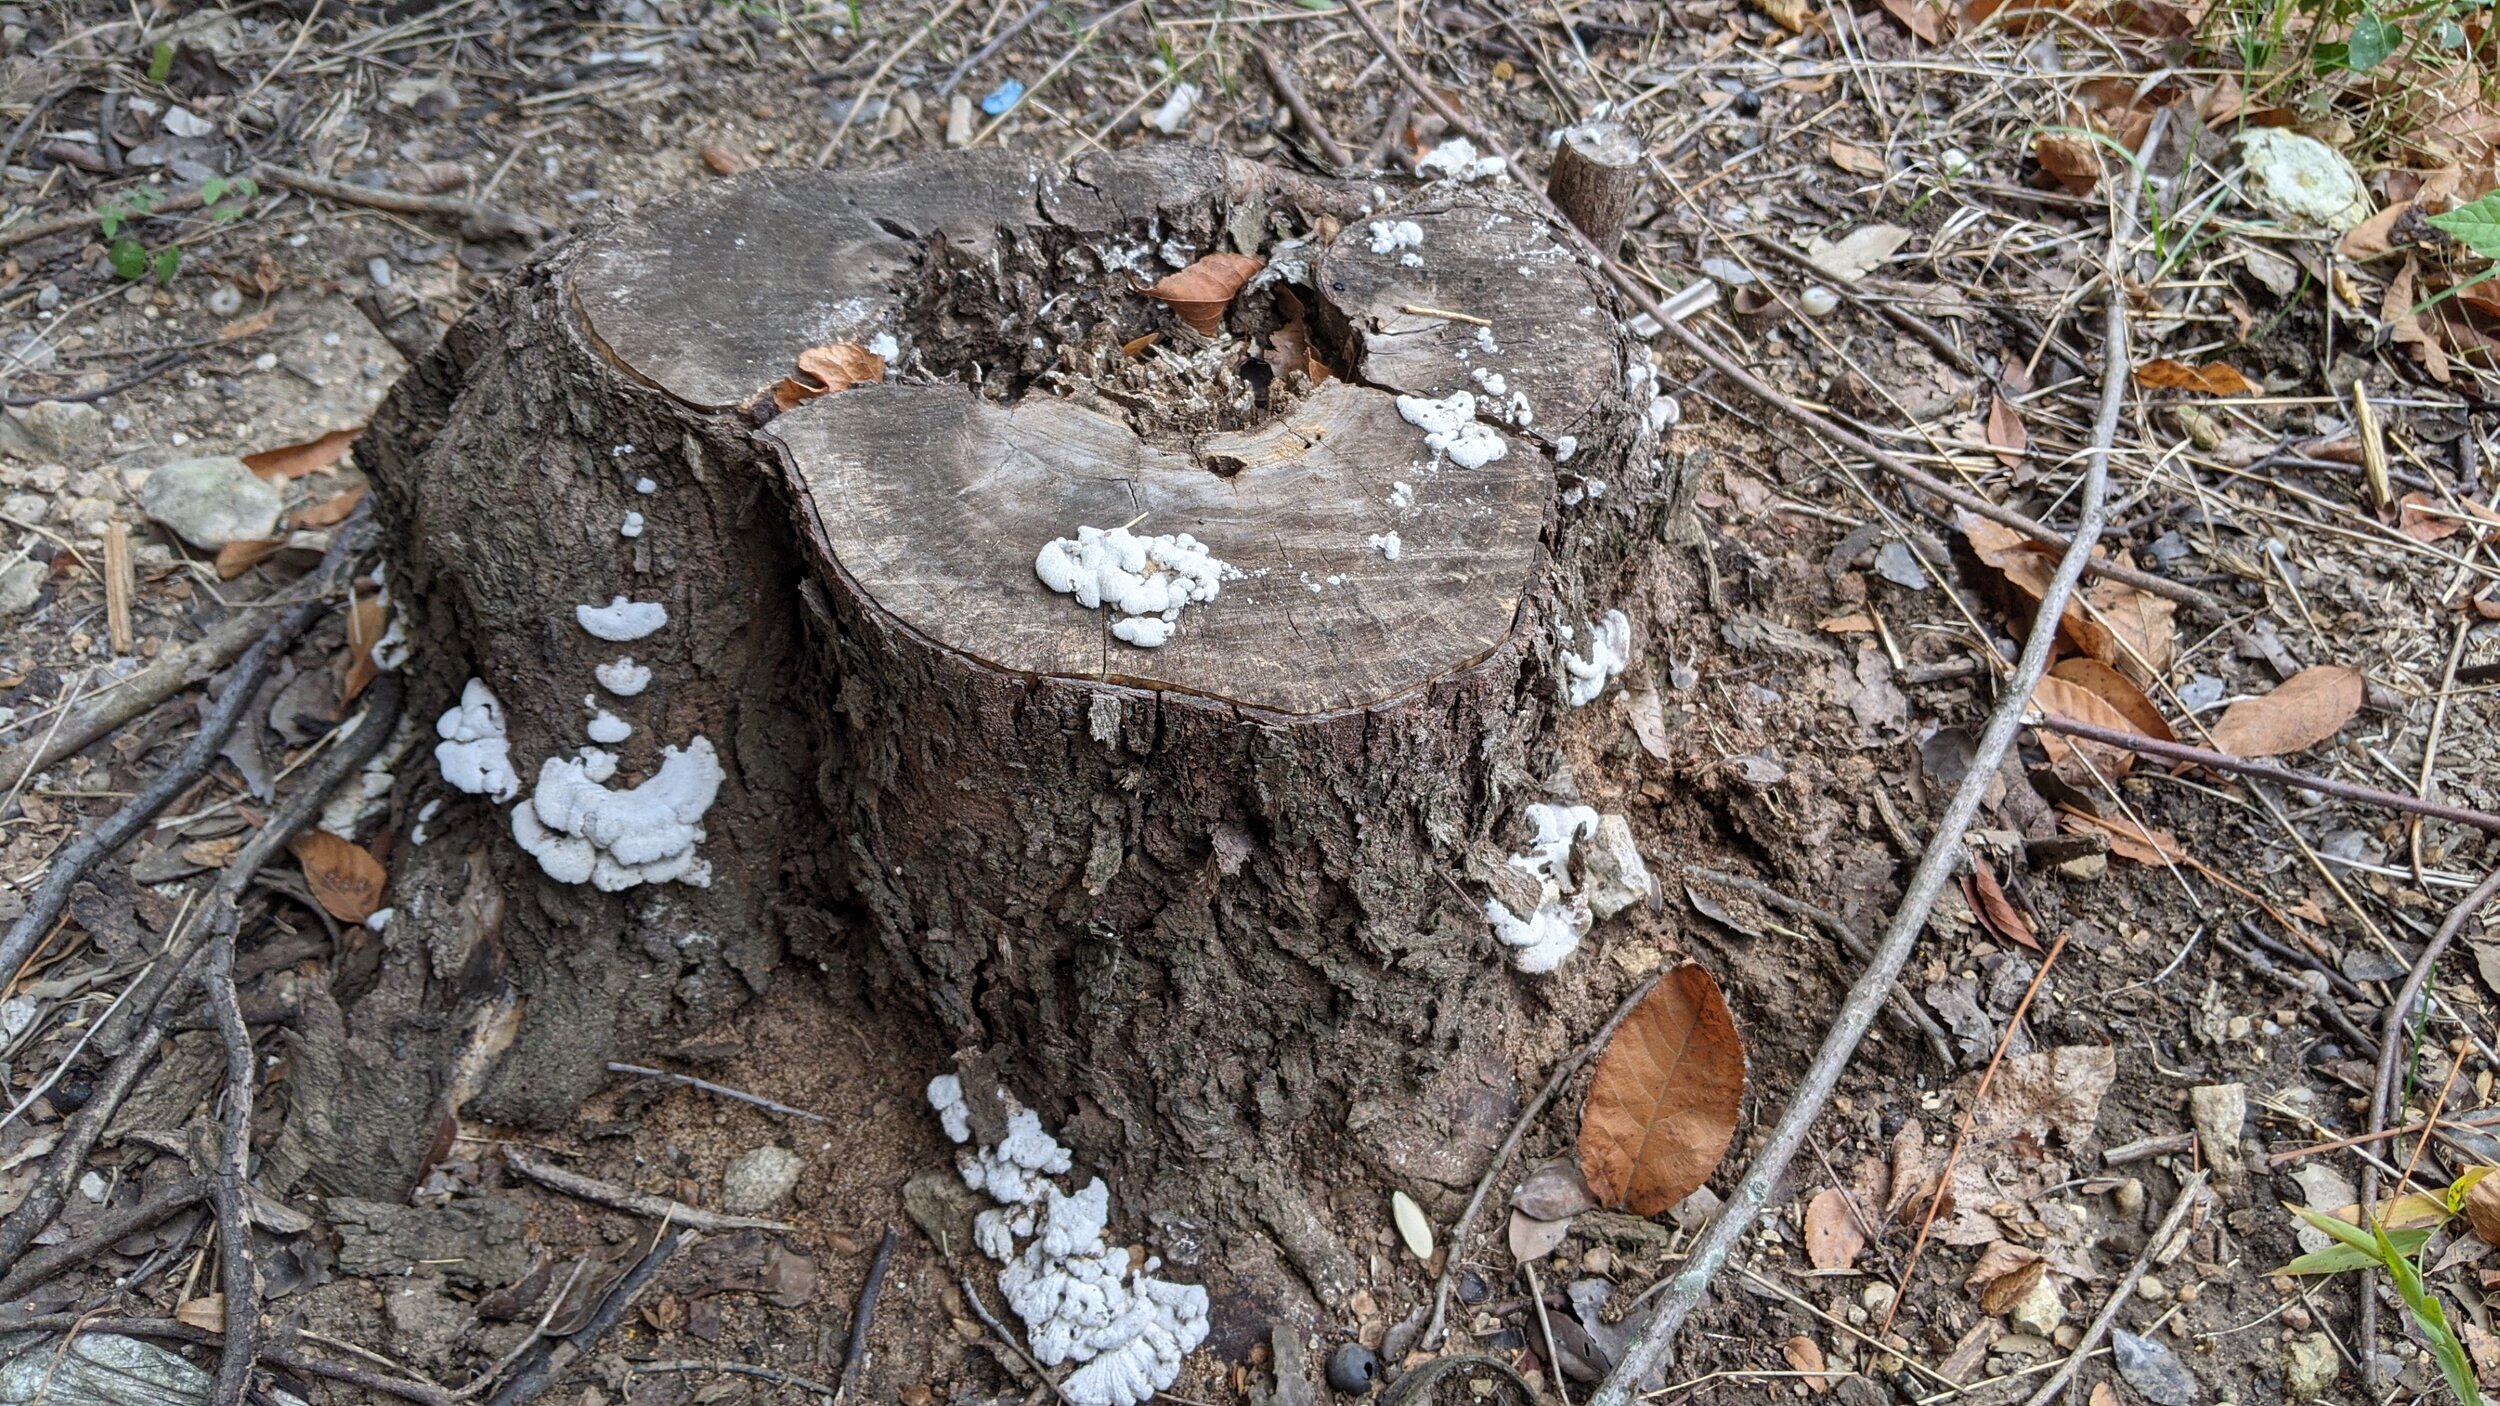
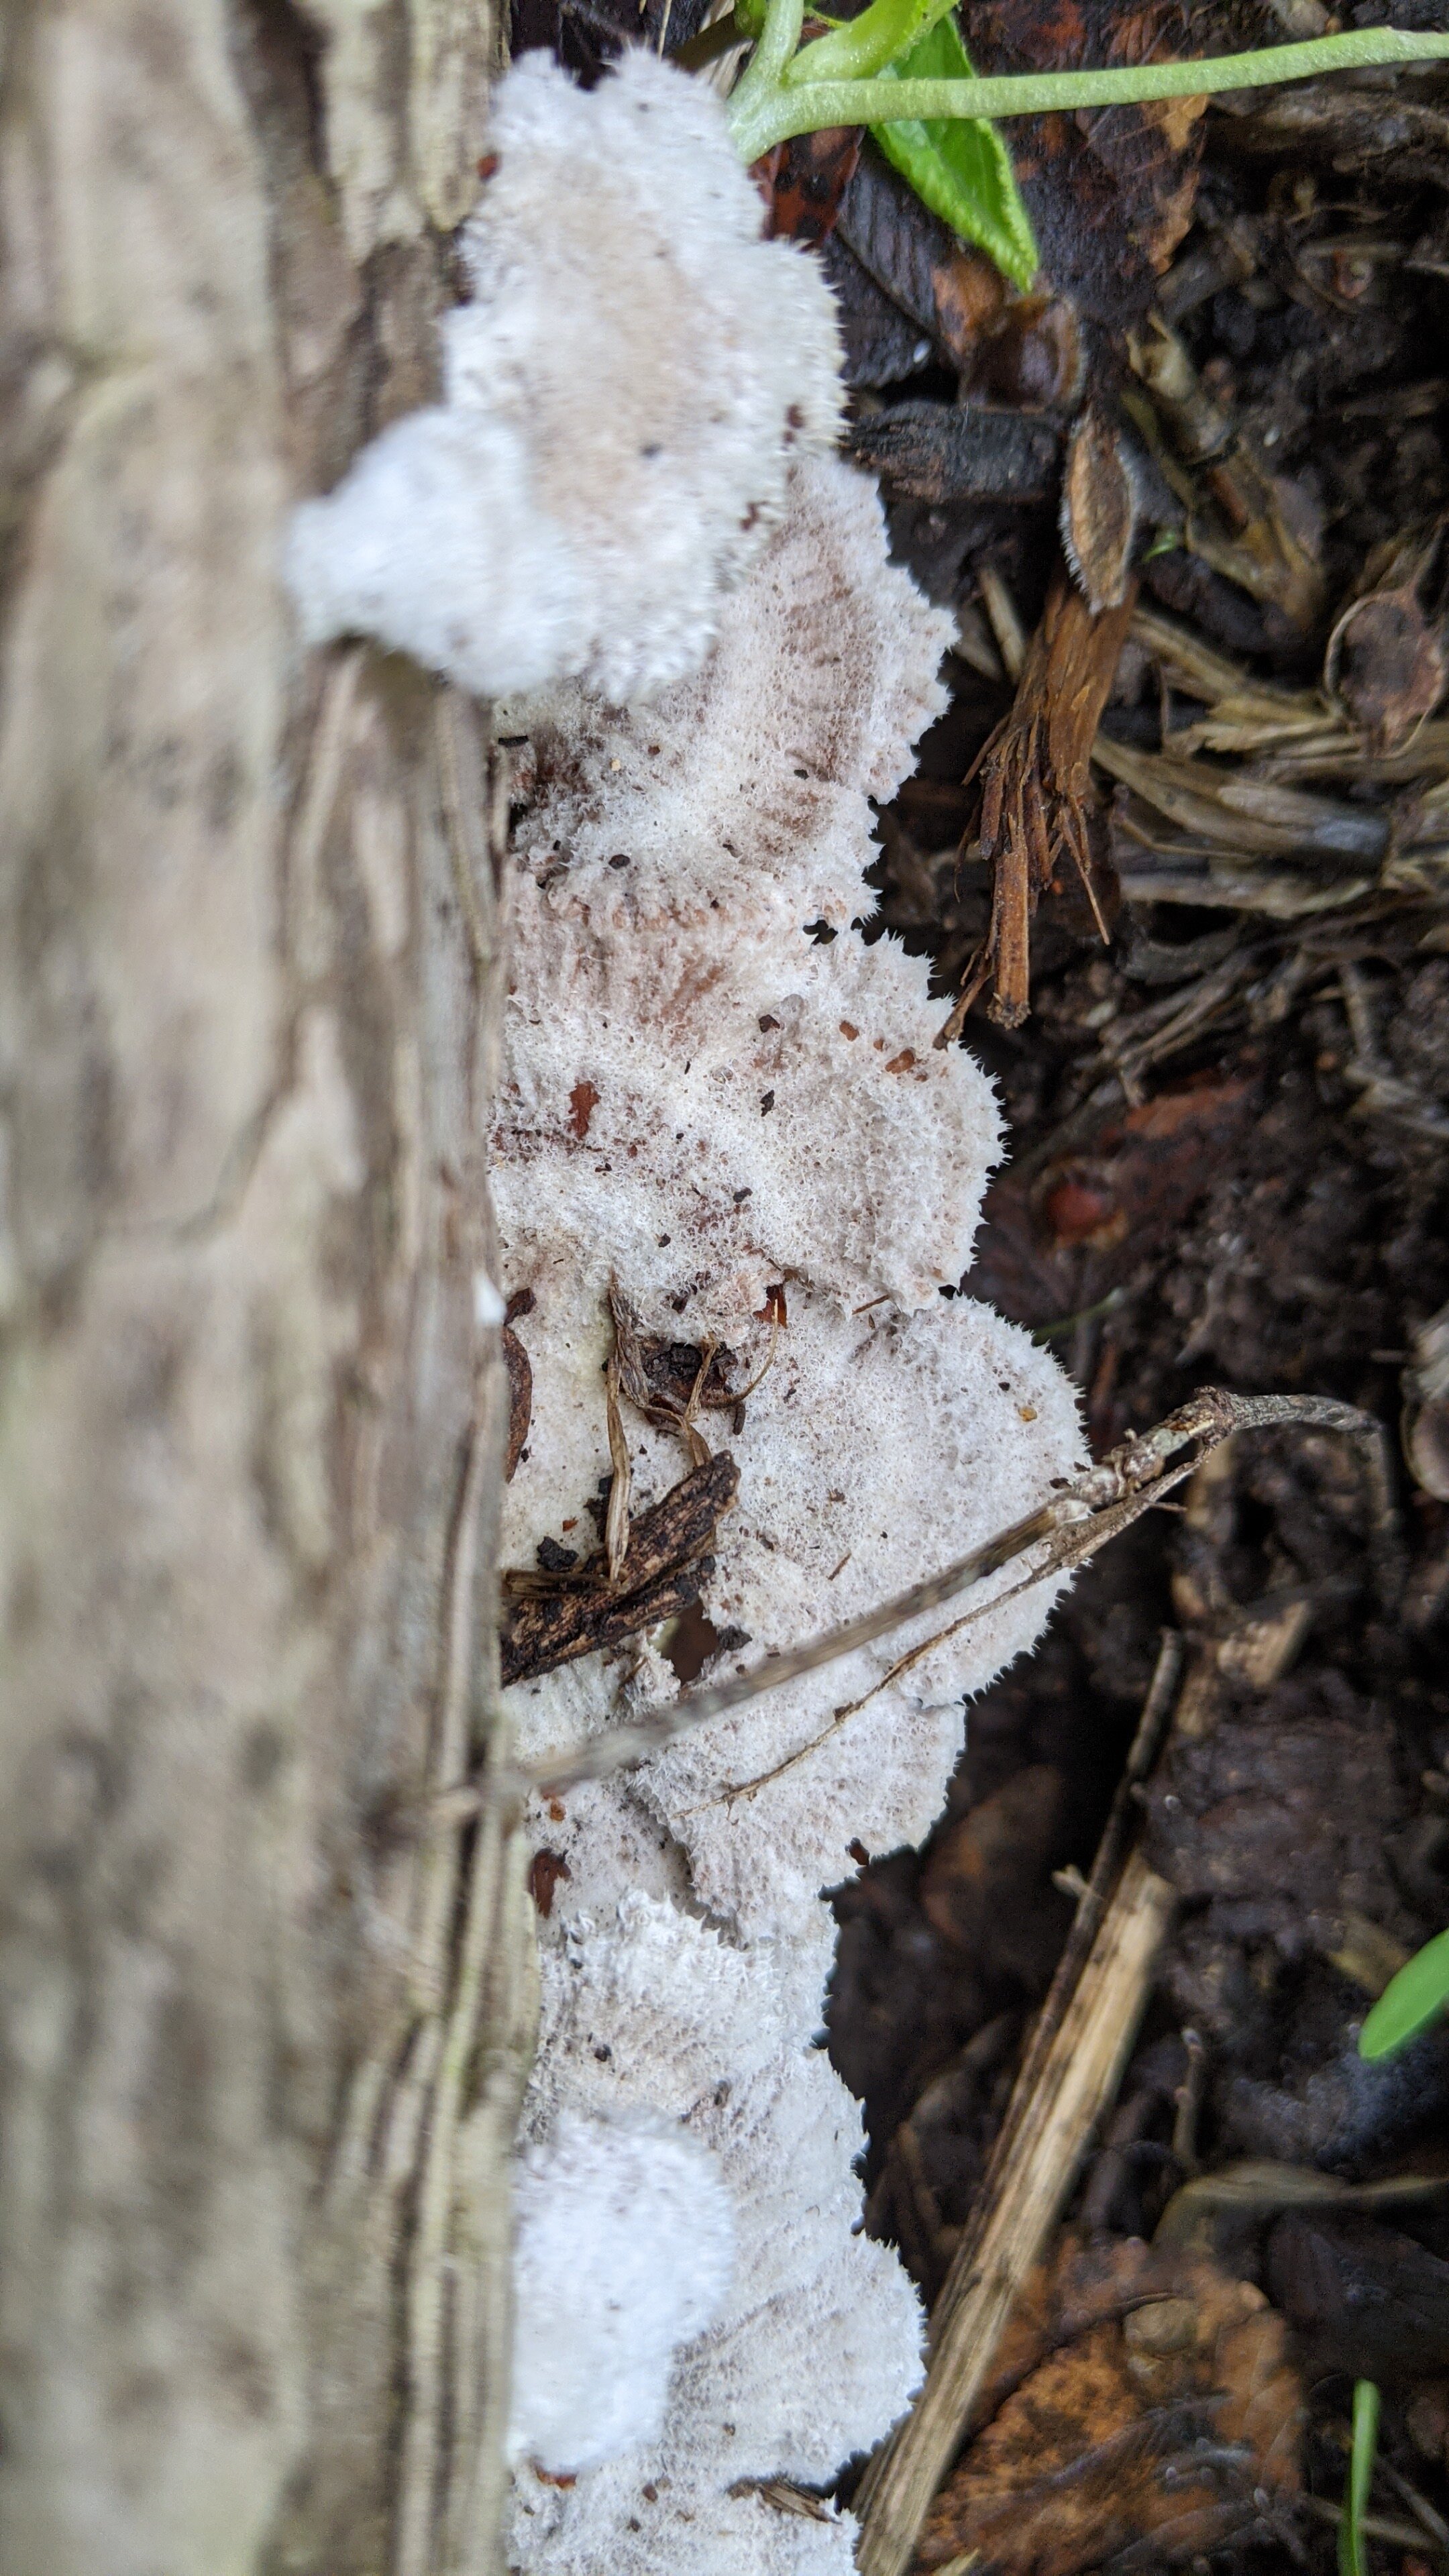

PHOTOS: Texas Star Mushroom
The Texas Stars came out for our Zilker Mushroom Project kick-off this afternoon. We saw it in its many forms, cigar all the way to full 6 points. They are found near dead cedar elms, which are all over Austin. Just look closely at the base of the dead stump for the cigar shape.
The Texas Stars came out for our Zilker Mushroom Project kick-off this afternoon. We saw it in its many forms, cigar all the way to full 6 points. They are found near dead cedar elms, which are all over Austin. Just look closely at the base of the dead stump for the cigar shape.
The Texas Star or Chorioactis geaster is only found in Central Texas area up into the Oklahoma border. It is also found in Japan and scientists do not know why this mushroom is only found in these two geographies or why it has a disjunct distribution. Genetic analysis has determined that the two populations have been separated for at least 19 million years ruling out the possibility of human introduction. Basically scientists have no idea why these two populations are separated by such distance.
We think this mushroom should be the Texas state mushroom. What do you all think?
Thanks to everyone that came out to help ID mushrooms within the Zilker study area. Anyone else can also participate by adding mushrooms they find in the Zilker Mushroom Project on iNaturalist.org.